Sunday, 11 October 2020

Tackling Writing, the interwoven skill: from KS3 to the GCSE exam

On this post I am going to focus on the skill of writing and how to develop accuracy as well as content and rich language. All key elements of the GCSE writing mark scheme. 

Writing is even more important this year as the oral exam, as such, is not going to take place, so on its own, this skill will hold 33% of the total GCSE mark.

Writing is intrinsically linked to accuracy, use of grammar and translation skills. Writing can support oral skills beautifully, as the content is the same for both exams. This is even more the case in Spanish and German as they are phonetic languages, so both skills truly correlate. Writing is also core for retrieval practice and a key tool to memorise vocabulary in many students. In other words, writing is the interwoven skill which underpins many others!


Below you can find some of my favourite techniques to practise writing and tackle accuracy and rich vocabulary use as from Y7!

Writing as a stickability, learning tool!

Any structure or key vocabulary that we want our students to embed in their long term memory, can be practised via writing. After introducing Sentence Builders, doing listening and reading tasks, before moving to controlled production via oral activities, I always plan writing tasks to help my students memorise key structures. 

1. Writing short sentences with mini whiteboards via Dictations

This technique is great for modelling and extremely powerful to practise key structures from current and previous topics. It means modelling via listening and writing at its best! Dictations are also great to train students' brain to recognise the link between phonemes and graphemes. As a teacher, in its simplest form,  I dictate  a sentence in Spanish and students write it down using mini whiteboards. Delayed Dictation is great here too for memory retention! Dictation in pairs works great too. 

2.Writing short sentences with mini whiteboards via short translations.

Same as above but I say sentences in English, based on our SBs, and students translate them into Spanish. Students get immediate feedback and the activity can lead to meta linguistic discussions with students, which they love: why this verb must end in a and not ar? Why la gasolina es caro would be wrong? How would we say it makes us feel good if we know me hace sentir bien means it makes me feel good?

To make it more interactive, I use small incentives: every three correct translations students get a sticker. Students keep a tally in their Onenotes and 15 stickers equals an Alpha. (Our school reward system). 

To make the process even more fun, I use taskmagic flashcards with pre thought key sentences showing initials in Spanish for support for less able students. 


Also, wheel of names works fantastically well this way and adds to the unpredictability aspect. I spin the wheels and students need to translate the sentence that both wheels show in English.


The randomiser activity in Flippity is also an invaluable tool for this technique. I click on the lever and students translate, using their mini whiteboards, the combinations showing. Vincent Everett and Mike Elliot use the randomiser for reading and oral practice too, in combination with Flipgrid. 


After one lesson practising controlled writing in this way we move to controlled oral practice using the same sentences but now to be carried out orally, instead of using mini whiteboards. This helps tremendously with fluency! 

3. The Random Name Picker feature in Flippity 

I have already talked about the Randomiser activity in Flippity. The  Random Name Picker activity is also very powerful if used with key vocab instead of names! You can choose, a spinner (similar to wheel of names) but also Group of two, three, four of five! These modalities create boxes with  two, three, four or five of the structures that you previously inserted. See example below.
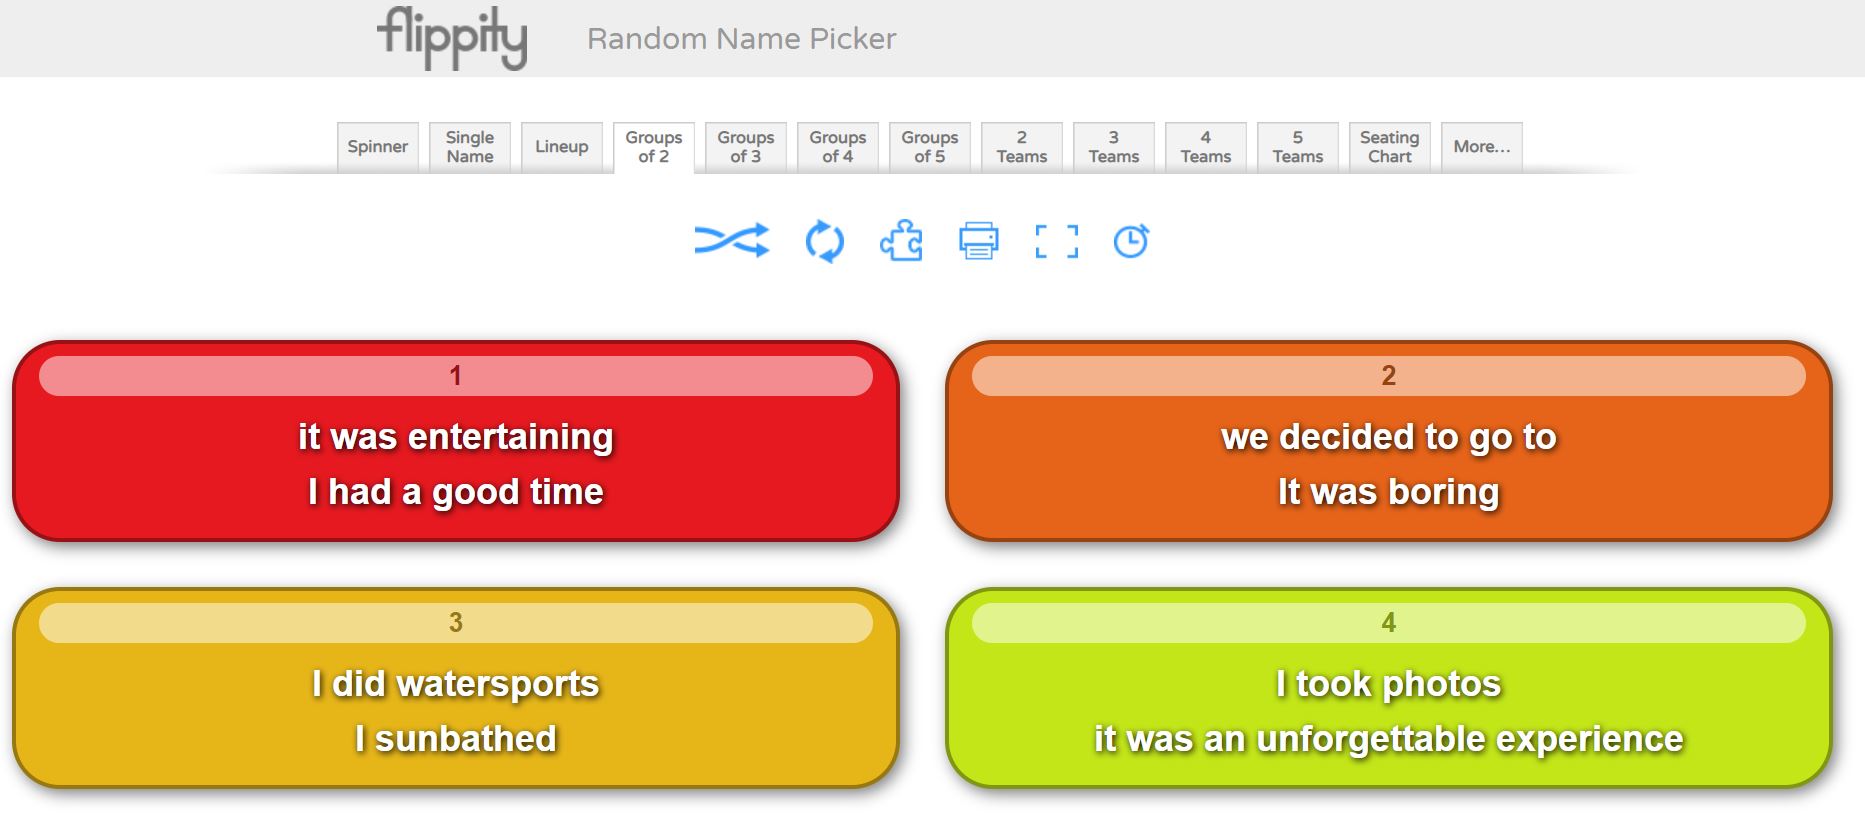
As an initial activity, I ask students to write a long sentence using the structures within box 1. To make it more challenging, I ask students to write a paragraph using boxes 1, 2 and 3, in lessons they do this with mini whiteboards. This is a very powerful and fun activity which will test the creativity of students and will move them away from mere translation tasks. As homework, this is also a great task.


4. Writing short sentences and paragraphs via Quizizz

I love Quizizz! It allows me to create my own quizzes and tests for retrieval practice and to practise writing skills! 

The modalities of Fill in the blank, where sentences in English have to be translated into Spanish, with immediate feedback for students and Open Ended, are my favourite! For the Open Ended modality, I write a bullet point in the style of the 90 words GCSE writing exam, I set the quiz for 5 minutes maximum per question, and they write down a paragraph covering the bullet point showing in the question in that time. It looks like this from the student's point of view:


This type of activity is very powerful after carrying out mini whiteboards tasks, and a Fill in the blank quiz. I would expect students to recall information from memory only, to do this. Students know that for each bullet point, the quiz consists of a maximum of 5 bullet points, they need to cover the point, give a justification and an opinion and make reference two at least two tenses. This would have been practised endlessly in my model sentences. 

5. Writing pyramids 

This technique has been inspired by Gianfranco Conti. It can be carried orally or in writing. Students work in pairs with mini whiteboards. I give them two writing pyramids in English, A and B, starting with a structure at the top and finishing with a short paragraph at the bottom of the pyramid. See example below.


Each student also gets their partner’s Spanish version of the pyramid. Student A starts translating the pyramid in their mini whiteboard and student B makes sure it is correct, if a mistake is made, student A must stop and wipe their board. Student B has a go with their pyramid, then, and student A checks that no mistake is made. When a mistake is made, student A starts translating again. Every time a student takes a turn, they must start from the top! This reinforces key structures, grammar and use of accents!

6. Tangled Translations

Students translate a paragraph into Spanish but the original text will be partly in English, partly in Spanish! 

7.  One pen one dice

The classic translation game! Students work in pairs. Student A starts translating a given text while student B, using a digital dice these days, rolls a dice until they get a 6. When they get a , student A must stop translating and student B starts doing it while student A rolls the dice. I tend to do this activity for about 10 minutes for fun and after that I just tell the students they must work on their own and translate the text freely. My experience is that otherwise, pupils may get extremely frustrated and give up!

A link to a digital dice can be found here

I love Vincent Everett suggestion of using this activity for students to make short sentences from their Sentence Builders, orally or in writing. This way, students make as many sentences as possible from a given Sentence Builder sheet, until their partner gets a 6. 

8. Running Dictation

This is a fun dictation activity in pairs! Students work in pairs. Texts in Spanish are placed around the room. Student A runs to their text, reads it, tries to memorise the information and runs to student B to whom they dictate what they memorised. Student B writes the information down. At the end, students check their written version to that of the text. It provides a great model example which can lead to reading and grammatical analysis of the text. 

9. Dictogloss

This is another multi skill-activity, incorporating, listening, reading, speaking and writing. I like doing this activity with two texts A/B. In pairs, students first work through text A and then text B, which are very similar!

1. Student A reads text A and writes a summary in English. Student B reads text B and writes a summary in English too.

2. Student A, using their notes in English must translate the text into Spanish to their partner who listens and transcribes in target language.

3. Student B completes step 2 with Text B

4. Both students compare their transcription with the original texts.  

10. Battleships 

I create a battleships grid which we have previously worked with for listening and speaking. As a writing task, I give students 15 or 20 coordinates and students write the sentences corresponding to these.  B1, B5, C5 etc.. 

Again, an extremely easy and versatile activity which really reinforces the grammatical and vocabulary structures that I want students to focus on. For high ability students, I ask my pupils to extend the sentences.


11. Four boxes

I learned about this activity from FaceBook, sorry as I do not remember from whom, and I love it as it does not require any preparation. I display four boxes in my screen and ask students to translate a given sentence using their mini whiteboards, after all show their mini whiteboards I ask for a volunteer to read their sentence, if it is correct I write their name in one of the boxes. I repeat the process four times, so all four boxes are filled in with a name. The fifth time, the volunteer student needs to choose one name in the box to be kicked out so that their name can be written in box instead. After some time, say 20 minutes, the four names in the four boxes win!  Students love this game and become extremely competitive. It works even better orally!  I use it in conjunction with TaskMagic or Flippity Randomiser. Mind that you need to know your students well and the relationships in the groups must be good. If you have a digital timer that students do not see, it makes the experience unpredictable and more fun. Thanks Vincent Everett for the tip! 

12. Slalom/Translation writing activities 

Another Gianfranco Conti activity, which he suggested that I added to this repertoire and which I have used on some occasions too. The idea is to present students with a grid of chunks in English or Target Language, which they need to manipulate to create their own paragraphs. With low ability students I find it is best to give them a list of sentences or a short paragraph in English for them to translate by combining the different chunks. High ability sets love creating their own paragraphs or sentences, these students will also benefit from being encouraged to use other language, apart from that in the grid, which promotes language manipulation. 

13. Editing writing tasks

Another suggestion from Gianfranco Conti to this blogpost. It’s simple! Just provide a model writing task and ask students to edit it by changing key words, modifying the tense it is written on, making the writing better by writing reasons and opinions or adding extra tenses! It works well if students are presented with a list of sentences that they need to make into a whole paragraph. Great if it is done like a competition in a collaborative way in teams: which team can write the best paragraph based on these sentences? Students can share their writings using Padlet and learn from each other's answers. 

Writing Tasks with Checklists

When handing out a writing task, I always include a check list to help students in the writing process: use reasons, use opinions, use at least three tenses, use key high impact expressions, use vocabulary from past readings and listenings. 


Use of sentence builders and random vocab

These are great for writing and students should know them really well as all of my SBs are linked to a specific quizlet course! However, I also make students create their own quizlet set with random vocab found in listening and reading tasks, which they must learn! 

When carrying out writing tasks, I expect them to use their SBs but also at least three expressions from their own personal random Quizlet. This improves their use of language massively if required to do in all longer Writing tasks!

I also practise this random vocab in conjunction with flippity: create a sentence with box one and two expressions from your random quizlet course. This works really well with high ability students.

Creative and Collaborative writing: Project based tasks

Once students have practised the language in the controlled, production stage of learning, via many translations and small creative paragraphs, they should be ready to write on their own following some guidelines.  At this point, project based tasks to be carried out individually or collaboratively with partners can be very motivating. If these tasks are part of a project with students in another country via eTwinning you have a winner!  For these type of assignments I tend to use Padlet or Google Slides. These projects tend to be carried out towards the end of a topic and are common practice at KS3, unfortunately much more difficult to fit at GCSE level!

1. Y7 Art Project on MirĂ³ and Picasso

This project includes Writing and Oral tasks, as well as creating your own MirĂ³ styled work of art. For full details and materials for the project, visit my post, The power of Culture, here. Scroll down until you find the Y7 project. 

2. Y8 etwinning project 

Rutas Molonas, a project designed to write about student's own regions.  This is done with our partner schools in France and Spain. Information on the project, can be found in my post, The power of Culture, here. Scroll down until you find the Y8 project.

3. Y9 cinema project

So far we have studied Voces Inocentes but this year we are going to study Coco. We will dedicate the whole Easter term to study different topics through the film with the intention of creating a Coco Film online book display on the film. Watch this space, as I will dedicate a post to the project and all the materials used for its delivery.

4. Y10 exchange experience project

In Y9 and Y10 students are given the opportunity to participate in a exchange. As part of their experience, students, in conjunction with their partners in Spain need to create a blog diary, using Padlet, of their experience there. This is collaborative and creative writing tangled as one and the results can be awesome!

How to tackle the second writing task in the GCSE exam

To prepare my students for that second task, I do all the above activities but also in Y11, every two weeks, we do a Timed Writing Task. Students are presented with a Writing Task sheet, see below.

Writing Task two Titles for GCSE

Every two weeks, for homework, students must prepare a task from the list above, which I select. I start with writing tasks incorporating topics from Y10. Students prepare their writing and during our lesson they write 150 words in 40 minutes from memory, only having the two bullet points in front of them for support. I start this process, every year, after Half-Term in October and we continue it until study leave. It works wonders as we recycle all writing tasks. 

I mark these writings using the AQA GCSE mark scheme. I highlight careless mistakes, which they must correct or add to, if not enough opinions given for example, as part of a second homework. 

Make the link between the General Conversation in the Speaking exam and the Writing exam

If, as part of homework students need to practise their oral questions for the speaking exam, make the next writing linked to the same theme/topic as this oral task. There’s a clear link between both exams and students need to understand such link!

They must realise that by revising potential oral questions for the general conversation they are, in fact, learning potential content for the writing tasks. Understanding this link breaks down the gigantic task of preparing four separate exams and the GCSE preparation, becomes a more topic based exercise: same structures to be used in four different ways! Such concept is also reinforced by using multi skilled activities and the same type tasks to practise different skills, for example Battleships for listening, oral and writing. Students must understand that all skills are interwoven and must be practised interlinked with each other.


Sunday, 4 October 2020

The Power of Feedback: Spinning the plates!

After four weeks of teaching, today, I would like to reflect on feedback and marking, as both are intrinsically linked, although feedback should be provided by other means rather than marking. 

Feedback is key to teaching, in fact, I believe that Teaching is constant Feedback. Feedback is extremely powerful: Hattie's meta-analysis suggests that good feedback can improve the rate of learning in one year by at least 50%. In fact, the most effective learners always long for feedback on how to get better.

Consequently, feedback should not be a mere marking, ticking box exercise done for SLT or Ofsted! Feedback must take place in the classroom to inform both, our students on how to get better and us, teachers, to check understanding and re-explain, re-model etc.. accordingly. In order words, Feedback should have a double purpose: closing the learning gap for students and inform planning for us, the teachers.

What are the best ways to give feedback to students?

Of course, marking students' work will need to be done at some point, but this should be a meaningful task not a ticking exercise imposed by school without clear follow-up and strategy. There are different ways, we can carry out marking and provide effective feedback while reducing workload, these are the strategies I use to make my marking manageable while providing high impact feedback to my students:

1. Focused editing

I do not mark every single mistake. I believe this is useless. It takes me ages to do so and on most occasions students will take just a minute to go over it with no impact whatsoever. What I do is highlight those mistakes that I know they should not have made, careless mistakes I call them. When work is returned, students always spend good 10 minutes (my starter activity) going through the highlighted bits and trying to spot why they are wrong and correct these errors. Similarly, if I noticed a common pattern in all my students, before they start this process, I point out, to the whole class, some of these mistakes so we reflect on why they are wrong and how to correct them. This is an example of how marking serves to both the student, but also informs me to plan subsequently. As a consequence, after marking a particularly piece of work, I can see that more lessons may be needed to practice different Sentence Builders or a grammatical point. 

2. Mark Live

Although this is not always easy to do, every so often, I see students individually over a key piece of writing. This is mostly the case towards the end of a unit. To do this, I put two lessons aside, when students are working individually over listening practice, so that I can go through a key piece of work, oral or written, with each student at a time. This can be extremely powerful but, I am aware that it may not work with the logistics of some classes, because of large numbers, behaviour management issues etc..  While I speak to each student individually, the rest of the students need also to be 100 % focussed on another activity, which is why individual listening practice with their laptops and headphones is the perfect scenario to do this. 

3. Open Gallery where students mark each other's work

This is another great technique to do every so often, which is powerful and alleviates the marking burden in the teacher. For this purpose I use Padlet for writing and Flipgrid for oral assignments. After a topic has been studied, practised and assimilated well, students will carry out a piece of writing or oral presentation in Padlet or Flipgrid. Armed with a marking scheme, which must be very familiar to students, pupils look at each other's work and mark it accordingly to such marking scheme while spotting errors etc.. This technique is powerful because students become increasingly familiar with a mark scheme, enhancing their exam technique, while they are forced to think about common accuracy errors. Similarly, students can see everyone's work which provides a fantastic model to work from and real peer inspiration!

On the other hand, this technique would only work in a class with a good learning environment where students feel safe with each other and are open to constructive peer criticism. That's why, from day one, the culture I instil in my lessons and students is that failing is the first step to success, in other words, only if you struggle learning does take place.  By creating such culture, students become positive towards potential failure and less anxious to have their work scrutinised by a peer member of the class. 

4. Oral feedback 

Along with highlighting careless mistakes, I always give students feedback on something that went really well and two/three wishes or targets to focus on a second piece of work. This can take a lot of time to write in students' books! We use Onenote in my school, which means, that I can insert an oral audio giving specific feedback to the students much, much quicker!  Oral feedback has reduced my marking time by 50%! Students have headphones with them, and as mentioned above, after work is returned, they are given reflection time to go over my feedback and highlighted bits, individually. In fact, students can respond to my feedback with another audio, where they are asked to model some sentences etc...

If you don't use Onenote, Qwiqr is perfect to do this! Basically, using Qwiqr QR stickers, you can give students fast oral, video or photo feedback. Most importantly, students as in with Onenote, can respond to such feedback with another QR sticker, making it the perfect tool for oral modelling tasks too. 

5. Live feedback in action: Spinning the plates

Use your normal lesson activities for constant live feedback, individually or as a class! Do not wait until you mark their work. Make them think on the spot. Keep moving plates spinning at once in your lessons. This can be done individually or collectively:

  • Move around, as much as we can move around in the current climate, and highlight mistakes you see on the go.
  • Point individual students towards a display or a section in their Onenote or exercise/text book
  • Ask students to review a paragraph or sentence
  • Ask key questions (which ending would you use to talk about what your mum does over the holidays?)
  • Show a model
  • Alert the class of common mistakes that you have spotted, re-explain, re-practice, read aloud or show a good piece.
  • Ask students how they are struggling and ask for solutions. 

If working via Onenote, going through students work, can be done from your desk so that you do not need to come near them!

6. Use self-marking tests

When planning homework tasks for classes, I try to do it so that one piece of homework is writing/reading/oral and another a learning task or listening, which I can quickly mark via a Forms test, Quizizz, LearningApps activity or just Quizlet! Students carry out the test or task in lesson time, without support and will get immediate feedback which, they report to me as a percentage. In a less digital way, I carry out classic tests in a lesson which they mark themselves, reporting their score to me. This is extremely effective as I can easily test how well they have learned vocabulary/ grammar while preventing me from taking a test home to mark!

7.Redrafting

Once feedback has been given, always ask students, in a second homework, maybe a couple of lessons later (interleaving), to carry out the task again, using the comments from their previous draft as a way to improve a subsequent version of their work. 

8. Use of Bitmojis for rewards

During lockdown I started using Bitmojis to reward good work from students. Previously, we used stickers to reward merits/ alphas etc.. according to the school protocol. However, as bitmojis are more personalised, the students preferred them so we have changed the use of old stickers for our bitmojis on Onenote. 

Giving rewards when students excel is another powerful strategy to provide psychological feedback, as students love competitions and are keen to do anything for getting my bitmoji!  This particularly works with disaffected students! By improving in small steps and being rewarded by it, students start believing in themselves and start taking pride in their work, because they feel their efforts are recognised. This culture is intrinsically linked to having high expectations on our students and expect the highest standard of work at all times, regardless of ability!  


Think about the Anchor effect: exposing students to content at a level usually considered above national expectations: at KS3, use of GCSE expressions, at GCSE, use of Alevel work. ANCHOR IN CHALLENGE and REWARD students for it, using your school system when giving FEEDBACK. This will contribute to their Growth Mindset!

By using these 8 techniques, I have witnessed how my students' work, regardless the ability has improved over the years, while my marking load has reduced drastically! FEEDBACK should be the PATH towards INDEPENDENT LEARNING so, it should be MEANINGFUL TO THE STUDENT AND INFORMATIVE TO OUR PLANNING, not a BURDEN imposed by the high spheres! Feedback should not only be present when marking but be embedded in our lessons: spinning the plates!


Sunday, 27 September 2020

Blended Learning: "How to " Tutorials for my favourite Digital Tools


have talked a lot about Digital Tools and how these can support my lessons, creating a Blended Learning experienced in my classroom.  See my post here

On this post, I am sharing some quick How to videos on how to use these tools in the classroom to create a Blended Learning experience.  These tools were also invaluable during lock-down!

In the videos, which are not edited so apologies if they are not perfect, I show how I create the resource and I quickly explain possible uses in the classroom for MFL but also for other subjects!

These tools are great for Retrieval Practice and when implemented in the classroom where students bring their own device, you suddenly have Blended Learning in action!  I use Onenote to share the activities created this way.  However, Google Classroom would be equally good. 

Since September, all my students bring their own device to lessons and they open their Onenote. I teach using, face to face techniques, activities through my board but also via activities using the apps from the videos, which have been previously shared via Onenote.  

During lessons, some students may work on the activities online while others may do oral work with me, or the whole class may work through the activities online. This is how I have been teaching for the last three weeks and my students love it!  Rather than doing an old-fashioned worksheet, students may do a Quizizz, Wheel of Names or a LearningApps activity!  As we cannot use board games now, students play board games (for oral, translation practice) via the Genially free digital boards!  

I have tried to maximise all the knowledge I acquired during Lock-down from amazing educators such as Joe Dale, Helen Meyers, Jane Basnett, Vincent Everett or Marie Allirot to just mention a few! I hope you find the video guides useful!  There are more guides to come: Flippity, Flipgrid and Padlet but on a second post as this has taken most of the Sunday morning to make. 

How to use Genially for Board Games in the Blended Learning Classroom


How to use Quizizz in the Blended Learning Classroom


How to use Google forms to create a simple Escape Room


How to use Learning Apps in the Blended Learning Classroom


How to use Wheel of Names in the Blended Classroom 


How to use Spiral.ac in the Blended Classroom


How to use ClassroomScreen in the Blended Classroom


Saturday, 19 September 2020

Teaching MFL at ALevel: A 10 step guide!

Teaching ALevel is very different from teaching KS3 and KS4 in the UK, or not? The approach is certainly different.  At this stage, Sentence Builders are not a must anymore, although learning some chunks with difficult expressions to express an idea, can be powerful! Similarly, the principles from cognitive science about how our memory works (transferring information/knowledge from the working memory to the long term memory) prevail. This means, that the recycling of ideas, structures, vocabulary, working with texts, milking them, teaching to analyse facts etc.. will need to be extensively modelled, practised with scaffolds until it leads to Fluency. Rosenshine and lexicogrammar still apply to A Level teaching.

At this stage, teaching single words is beneficial and studying grammar explicitly, as well as implicitly, via texts, is essential. Similarly, teaching the ALevel syllabus is not just about teaching a MFL but developing high thinking order skills, studying literature, film studies and most importantly, assimilating facts about the target country which students must analyse and draw conclusions from, this will need to be modelled and extensively practised! It is like a General Studies course but in a MFL, not easy! 

The Setting of High Expectations: The iceberg model!

On the first day of lessons, I go through our MFL Sixth Form booklet which, clearly explains what is expected from our Alevel students from day one! Normally the gap between GCSE and Alevel is big! The booklet makes reference to the Iceberg metaphor: the visible part of the iceberg represents lessons, while the invisible part underneath, refers to self study work!

The MFL Sixth Form Handbook

The handbook points out the skills that will need to be developed, under the surface outside lessons, to be successful in the course, as well as providing a model timetable of self study. Lesson work, alone, it is not enough! Finally, it gives students ideas on how to practise the different skills of reading, listening, vocabulary and grammar learning, independently. For that I also create a bank of resources for students to choose from to carry out their own independent study tasks, as explained in their booklet. Zig-Zag podcasts, films and Authentik reading resources are invaluable here. See picture below. 


My 10 Step Guide

The approach I use to teach the Spanish Alevel AQA syllabus, with some variations, is the Teaching Through Text based approach, which correlates nicely with lexicogrammar and whose foundation is rooted in cognitive silcience. This is what I do for each given topic, say, Changes in Family in Spanish society, in Y12.

1. I start my sequence of lessons with an oral activity similar to those carried out at GCSE level on the topic of family. This is normally a group discussion activity where students talk about themselves and their families, with a final thought proving question, in Spanish, such as what does a typical family look like? Is it normal that grand parents live with their children?  Some key vocabulary can be given to conduct the activity, or this may appear spontaneously while carrying out the task. This is a Retrieval classic task. 

2. At a second stage, in the same lesson, I show students some photos in relation to the topic, in this case I would show them photos of different types of families. At Y12, I would expect answers similar to those given for the Photocard in the oral GCSE exam. Students speak in groups for this activity and we carry out a brainstorming of ideas towards the end. Again, I finish the activity with a thought provoking question: how do you think is the typical Spanish family? Why do you think is this way? In Spanish of course! After brainstorming students’ ideas, I give some ideas myself, in Spanish. This is listening in action and modelling! I will speak slowly writing key words on the board. While I do this, for not more than 5 minutes, I frequently stop to check understanding of ideas and vocab. 

3. In another lesson, we start working with a text on the topic. More modelling, focussing on form to move to meaning. I always start with a text from the textbook. Yes! I do use a main textbook for Alevel supported by many other resources, such as newspapers and Youtube original videos! We read the text aloud during lesson time and translate it, word by word, into English analysing vocabulary and verb tenses in the process. This activity normally takes a whole lesson but students learn lots of vocabulary and revise many grammatical rules, especially tenses! I love doing this because students get knowledge of the society, learn vocabulary and go over grammar in one task! A winner! Students are asked to learn the vocabulary for homework. See below for an example of such a text with important verbs highlighted in blue and key vocabulary in yellow.


4. As a follow-up activity, I prepare a second text, in English, which I break up in sentences, based in the vocabulary learned at the previous stage. More modelling and structured production. For this activity I normally use TaskMagic and students use whiteboards. I basically expect them to use the vocabulary discussed and learned at the previous stage. If the group is good, we do this orally. For homework, using the practised vocabulary, they write a 70 word summary of the text. Summarising a text is a skill I tackle from the very beginning, which is one of the tasks they will need to complete in the actual Alevel exam (in the reading and listening sections).


5. We work on a second text, this time through listening. We are lucky to have a language lab but if students bring their own laptops and headphones, you can create a language lab in your own classroom! At this stage I create my own listening exercises, as I do at KS3/4. When I do this I create tasks to practise vocabulary, grammar as well as listening comprehension, with tasks similar to those required in the exam. I always provide students with the transcript. This is important because the listening can then become a reading activity and the text a source of information to get ideas about the studied topic, which students can, later, use to carry out the oral exam. Another reading text with specific vocabulary and grammar concepts is used for homework.

Example of Listening Tasks based on texts on the topic of Family

As linguistic skills start developing in our students, I introduce Youtube videos or short film extracts at this stage.

6. We carry out an official grammar lesson every week, if possible linked to a particular topic. For example on the topic of family we revise the present and imperfect tenses. At this stage of their language learning, grammar lessons are explicit, as I believe students studying a language at Alevel must have a love for linguistics! However, the activities we carry out to practise structures are very similar to those at GCSE: games via snakes and ladders, connect 4, wheel of names and use of mini whiteboards! 

7. Language assistant use

All my students have 6 lessons of Spanish a week plus an oral individual lesson with our language assistant. This lesson is vital as this is an opportunity for students to demonstrate their knowledge on a particular topic orally! We work very closely with our language assistants so that they have complete access to our course resources/lessons and know what we are covering at all times. This communication is vital. My language assistant does know all the texts I have covered so she knows what content and grammar to expect from the students and will prepare her oral classes accordingly. Students from day one are exposed to texts from which they will get information, which they need to reuse to back up their ideas in an oral scenario.

Our wonderful language assistant, Arancha Lorente, has also created two oral booklets for our students. She bases her oral sessions on the information we share with her in relation to our lessons, but also on the texts and oral bullet points highlighted in her invaluable booklets. Similarly, her compilation of texts taken from many sources: the Level AQA Oxford textbook, newspaper articles etc.. forms the foundation of our teaching!

8. The Lecture-Styled lesson

At this stage, I carry out a Lecture-style listening lesson based on me giving information, supported by a video and/or pictures on a topic. This is the lecturing part of the sequence! Students listen to me and take notes on the ideas/experiences I share. My students love this stage as it is based on story telling structures, a great technique for modelling! I support my lecture with key words on the board and I also use the vocabulary and ideas studied within the different texts in previous stages. This activity prepares students for university too! They listen, take notes and ask questions in Spanish! For homework, students are asked to prepare the oral questions from their oral booklet. To do this, students will use the ideas, vocabulary and grammar practised in all previous lessons within the topic.  

9. After exposure to two or three texts and my lecture style lesson, students will start assimilating ideas about topic of family in Spain, they will know how the family unit was composed in Franco times and how it has changed nowadays and its impacts. At this stage we carry another oral lesson where questions checking understanding on different data on family are practised. These will be based on the content of the texts studied in previous lessons and the oral questions they previously prepared .At this stage we carry out oral games such as Genially in lessons. See example below.  Debates at this final stage also prove to be great! Flipgrid can also be used for students to generate opinions and other students respond to those!

10. The final stage of this model involves exam style questions collated via Exampro! 

When working with texts, apart from translations, summaries and comprehension questions, we work a lot of on fill in the gaps type of activities.  My experience is that students find this type of task particularly difficult in the actual Alevel Exam!

The film/the book and the Individual Research Project

We study a film in Y12, and a book and IRP in Y13. In Y12, students dedicate two lessons per week to the study of the film. Similarly in Y13, students spend three lessosn per week, during two terms studying a literature title. We empower our language assistants with the management of the IRP as they conduct the oral exam in the department, of course, supported, at all stages, by the teachers in the classroom. 

I will explain my approach to literature in another post!

To sum up, the key goal at Alevel is to provide students with ideas through texts which they can use to analyse the target society they are studying while practising exam style questions from day one! 


Saturday, 12 September 2020

Tackling Speaking from KS3 to the GCSE Exam!

On this post I am going to concentrate on the wonderful skill of Speaking. Everyone will agree that is the most important skill, together with listening, when we learn a language. You can get away without writing the language, even reading it (long passages anyway) but not without speaking it! 

Most importantly, students measure their language learning success against their oral ability and this tends to be low, which results in poor motivation and very low language uptake beyond GCSE, in the case of the UK. So, although not officially part of the GCSE exam this year, oral skills must not be forgotten in the current climate.

Speaking is perceived as difficult because it requires hours and hours of practice, which we just simply do not have in the curriculum. If we add to the equation a long syllabus content, we have a recipe for disaster, as students end up with cognitive load, meaning that there are not enough opportunities for students’ brains to embed the language and automatise it internally.

What’s the solution?

Creating real life experience opportunities where to use the language is important, as mentioned in two previous posts on the power of culture and the importance of providing extracurricular activities in the MFL curriculum. Similarly, teaching structures for  students to use the language during lesson activities is vital too, including vocabulary to interact with each other: it’s your turn! You are cheating! I do not understand etc.. When you hear students using this language praise them! Make speaking in the target language fun and worth doing it!

Similarly, at the same time, we need to structure and plan speaking tasks, highly linked to listening, in our classroom experience as much as possible, including spontaneity. When doing this, think small! Less is normally more! 

I tend to teach structures via Sentence Builders, I practise these, through listening and orally as much as possible in lessons and move to the next lot of structures: step by step, using retrieving practice in the process. I hardly do reading and writing activities in my lessons (unless they are part of short outbreaks of retrieval practice with mini whiteboards). I leave those tasks for homework. I use my lessons to provide as many listening and speaking opportunities as possible! These are some of my favourite classics!

Oral Battleships

A classic in my lessons. I do it as a listening but, mainly as an oral activity. The idea is simple: I write language on the top row (blue) and the first column (orange), which allows students to create different oral sentence combinations. Students tick 6/7 boxes (ships) and they need to try and guess where their partner’s ticks (ships) are by creating different combinations with the input on the row and column. See the example below.


I love battleships because it can be done at all levels and to practise ANY structure: 

1. Different grammatical persons on the top and different infinitives on the column (like the example above), with the aim to conjugate verbs in a given tense. This can be expanded to say a sentence with the conjugated verb!

1. Sentences in the present on the top row and in the past on the first column, with any other verb tense combinations, so students create sentences using two tenses.

Example here on Present and Past practice on Holidays

2. Nouns on the top and adjectives on the first column, to practise adjective agreement.

Example here with Animals and Colours (second page)

3. Expressions needing subjunctive on the top and verbs in infinitive in the first column which require the formation of the subjunctive.

Example here on Subjunctive and Environmental issues

4. Vincent Everett also proposes to fill in the squares in the Battleships with extra chunks for students to reproduce orally: top row I swim in the sea, side column but I wanted to sunbathe, middle square, because it was more fun. 

The possibilities are endless! To stretch able kids, I always ask students to extend their sentences with something they can think on the spot using high impact expressions, for example.

Information Gap Activities

Any type, any shape of these. Basically, any activity that requires students to get missing information from a partner or partners. Once structures haven been over practised through listening, reading and short, brisk translations, students can start practising the language themselves. This stage is still controlled production as I tend to specify in the activity what I want them to say: different SBs combinations! 

Example of Information gap activity based on questions and exchange of  information

Example of Information gap activity based on filling in an incomplete table, topic of health

My students love these activities because there is a real communicative purpose and they are achievable as they are based on the Sentence Builders practised in previous lessons. They also increase their confidence as I tend to use long paragraphs so there’s a sense of accomplishment.

Stealing Sentences

This idea is taken from the Gianfranco Conti repertoire. It’s uncomplicated and in its simplest form, it allows just reading: I usually display 7 sentences on the board, students choose 4 numbers at random which they write at the back of their books (I don’t give them pieces of papers anymore which they can physically steal because of COVID). Students move around the classroom reading the sentences to people. If the student they speak to has the number of the sentence they are reading, they are entitled to steal it: writing the number in their book, while the other student will have to cross it from their list. The person with most stolen numbers/ sentences wins! 

At a second stage, after10 minutes doing this I present the same sentences with gaps in them:


At a third stage, I show the English translations with the Spanish initials. At this point, students have been working with these sentences for nearly a whole lesson and can just reproduce them by heart! I make the sentences longer or shorter depending on ability!


As a follow up, students write the sentences and create their own ones.

Oral ping-pong

Another Gianfranco Conti classic. This is really a type of information gap activity. Students are given a sheet with a list of sentences in English. The sentences are the same in both cases but student A has the Spanish translation to the first half of the sentences while student B  has the other half. Students take turns, hence the Ping-Pong name, to translate orally the sentences they do not have the translation for.  Partners listen to their opponent and check the accuracy of oral translations using their sheet. If perfect, they award 2 points if there’s a mistake 1 point, more than 1 mistake, no points at all. When mistakes are made, students show the correct answer to their partners, creating really interesting metalinguitic discussions! 


Find someone who

I prepare pairs of cards, examples:

1. Find someone with the same names as you. On cards: MarĂ­a  FernĂ¡ndez, Luisa GarcĂ­a. For Y7.

2. Find someone with two digits in their phone number the same as yours. On cards: 44 6422, 44 23 68. For Y7.

3. Find someone who plays this sport. On cards: Juego al fĂºtbol. 

4. Find someone whose sentence combined with yours, makes sense.  Cards: ¿Vas a ir al cine mañana?, SĂ­, mañana voy a ir al cine porque ponen mi pelĂ­cula favorita.  

5. You are spy. You have to find your fellow agent who has the same secret codeword as you. You have to drop this word or phrase (on card) into a normal conversation. Cards: los sĂ¡bados me gusta desayunar salchichas. For Y11 and Alevel.

Speed Dating

Students are placed in two lines/ or two circles, one inside the other, facing each other. They must have a conversation with the person opposite to them. At the signal from the teacher, often a clap, the children from the outer circle or one of the lines, move towards the left, changing partners. They now perform the conversation again, at a second signal, students move to the left again (from the outer circle or one of the lines) and so and so on. I tend to do this outside, weather permitting! I also give them a list of questions to choose from, or prompts to formulate the questions themselves! Great for all levels but it is a fantastic way to practise the General Conversation questions for the GCSE oral exam. Also, I ask students to answer their questions, say in 3 minutes, but when they change partners to do it in 2 minutes and finally in 1 minute so they develop fluency! 

Dictogloss

This is a great activity that can be used to practise oral or writing skills! I present students with 2 texts, one for student A and one for student B, similar but not the same. Students do have time to read their won text in silence and take notes in English on it, not a literal translation. After 5/10 minutes, depending on the size of the text, students work in pairs: Student A will recreate their text, orally, using the notes they took in English, while student B will listen and will write in Spanish, not literally but the gist, what they understand from their partner! Student B does the same with student A. This activity is great because incorporates reading, listening, writing and speaking at once! Great for fluency! It can be repeated several times, but each time, you can ask students to be faster, hence, work on fluency, adopting the 3,2,1 strategy!

Spider Game

Teacher throws a wool ball to one student and asks a question. This student gets hold of some wool and throws the ball to another student while asking another question, the third student answers the question, keeps some of the wool thread and throws the ball to someone else and asks another question and so on. The idea is that students create a spider web with the wool every time they throw the ball. It is great for generating questions but difficult to carry out in a Covid environment.

Piedra, Papel, Tijera: evoluciĂ³n! (Stone, paper, scissors, evolution) 

I love this activity as it requires minimal preparation! The evolution part I heard it from Rachel Hawes. I put an open question on the board: talk about your holidays. Students play piedra, papel, tijera. Whoever wins needs to talk for a minute in the topic. If successful they move in the evolution chain. They evolve from egg, chick, bird, elephant to superman. Whoever gets to superman first wins! I have used this game with the GCSE photocard: students are given  series of photos and they talk about the photo for one minute when they win. Students can also ask each other questions in the card. 


Dice games in pairs or groups

There are lots of variations to this activity but basically, teacher prepares 6/12 key words on the board attached to numbers 1 to 6 or 2 to 12 if working with two sets of dice. Students work in pairs or groups by throwing the dice and saying a sentence with the key word which corresponds to the number in the dice. On the board, you can have question words, sentences to be translated and extended, key words to develop at Alevel etc... as dice cannot be used at the moment, I am still carrying out the activity using this digital version of dice. I share it with my students and they open the link on their own device: Interactive dice.

Board games

Any board game: snakes and ladders, connect four, trivial etc.. are great ways to practice oral: if students fall in a square they need to translate a sentence from a pack of cards, or create a sentence using a particular word, or create a sentence on a particular topic using a particular high impact expression. These can be in cards. I use these a lot to practise the GCSE general conversation exam. As boards cannot be used at the moment, I am using the interactive board games on Genially or from PowerPoint templates. 

Jenga Same as above but students need to do something before they can remove a piece of Jenga. Unfortunate I haven’t found an interactive version of this game yet!

Oral activities and IT tools

Wheel of names

I talk about this app on a previous post here. In the current climate, I share my Wheel of names activity link with students who can play from their own devices in pairs. This is a hit at the moment in my lessons! There are many activities to do:

  1. you can display key words and students need to create a sentence
  2. Students need to translate a sentence
  3. Students need to create questions
  4. Students need to talk for a minute on a given topic

PowerPoint Games

Check these lists of interactive game templates below to practise oral skills as a whole class  or individually! 

PowerPoint game templates

10 more PowerPoint games

Genially

You can use the templates within Genially to generate Boardgames to be played by groups of students together. 

Flipgrid

This is a great app for oral practice. I create a group for each of my classes and then threads on whatever I want them to give a presentation on. I use this at the last stage of the learning cycle: Spontaneity and free output from students! Great to practice the GCSE photocard and General Conversion questions. I love this app because I can create model answers to questions and provide feedback to students based on a predetermined mark scheme. Students can also see each other videos, although you can disable this feature, and learn from each other’s answers and, even better, contribute with an opinion to a certain video. This last option works best with Alevel students! Check Jane Basnett's blog for further ideas using Flipgrid!

Padlet

Great for oral practice too! You can insert a picture and students record themselves describing it and answering to the questions that come with it! As in the case of Flipgrid, this is great for a sharing culture in the classroom as all students can listen to each other’s inputs. Personally, I find that extremely empowering! 

Flippity

I love the Randomizer element of Flippity to practise oral skills. I enter the Sentence Builders in each box and students play the randomizer, and translate the sentences that appear.  As a follow up they must extend the actual sentence or doing the sentence in writing. 

HOW I TACKLE THE GCSE ORAL EXAM

Our department’s philosophy is NOT to teach for the exam but teach a skill which, if learned well, will allow students pass the exam. We do not start teaching exam style questions such as Roleplays and Photocards at KS3. Instead, we put oral skills at the core of our face to face lessons so students become confident speakers from day one in general. At a second stage, we, inevitably, prepare them for the GCSE exam, but not until they are actually doing their GCSE course.

This is the process I follow:

1. Oral activities, like the ones described above, are 100% embedded in all my lessons. Those activities which I have identified as good for GCSE are key to develop the skills the students will later need to tackle the oral exam.

2. After a topic is finished, I plan a couple of oral lessons where I go through Photocards and Roleplays. For this purpose we have an oral booklet with past Roleplays and Photocards to choose from. Activities such as Paper, Stone, Scissors are great for this! Also Flipgrid presentations for homework, where students need to prepare and talk about a photo from their booklet, including the surprise questions is good practice too.

Y10 oral booklet

3. Also for prep, students complete in writing, model answers for potential oral questions which they can use for the General Conversation, also available in their oral booklet.

4. We start a new topic but our oral assistant carries out one to one practice on either the general conversation questions or the photocard/roleplay.

5. I come back to step 1 but I always use retrieval practice to include in my oral/listening activities content from past topics.

6. Every 3 weeks during Y10 I plan oral an oral lesson where students practise the general conversation questions via Board Games or dice games. Our oral assistant keeps working with the students one to one during lessons.

7. In Y11 one lesson every other week is spent doing oral practice in pairs/groups: one lesson Roleplay and Photocard and another lesson just General Conversation questions. 

8. For prep they get to carry out, without help, mini presentations on Flipgrid on a given topic.

Writing model answers to questions for the General Conversation and practising these in pairs or individually via Flipgrid mini presentations is key! Students start reusing the same vocab/structures over and over again. This will not only be good for the oral per se, but also for the writing exam! In Y11 to reinforce this idea, every other week we dedicate a lesson to time writing based on a topic of the syllabus, in exam conditions. 

Finally, we aim to finish all the syllabus by the end of February in Y11. We conduct the oral exams after Easter. Therefore, we have around 7 weeks of teaching where each lesson (3 per week) is dedicated to one skill: oral, listening, writing/translation. Reading is done at home. To do this practice we use exam style questions via Exampro and Photocards, Roleplays from our oral booklet. 

During the oral lesson, at this stage, I, and the oral assistant, work with students one to one while they work in pairs, providing individual feedback.

Finally, the circle closes with extra practice, in pairs, during lunch time and after school. We make these sessions compulsory and I create a timetable where all students, in pairs, are given a 15 minute slot. We start this extra practice in February in Y11 up to their oral exam. 

This last strategy is a luxury, as we may not have time to do so a particular year because of school commitments etc.. but I always try to offer this practice at least a few weeks before the oral exam!

Whatever I do for the GCSE oral exam, the key is to embed oral skills in lessons as much as possible! So during Y10 and, especially Y11, I only need to focus on the actual exam structure not teaching students how to speak. 


From 9 to 1: Teaching the mixed ability class at GCSE

After a relaxing summer, away from social media, I am back just for the release of the GCSE exam results. I am generally very pleased with o...