Saturday 25 July 2020

A typical lesson sequence: structured spontaneous production and routinisation

After the introduction and controlled production stages, we reach the final stage of a unit sequence, the free production of language from the part of the students.  This is a painstakingly slow process in many cases and given the constraints of  the GCSE syllabus, a big issue, as we have to rush content through all the different stages because of an unrealistic vast curriculum  to cover and the issue of curriculum time constrictions for MFL. How have I overcome this issue? I haven't completely! but I have managed to minimise it by focussing on a KS3 simple but efficient SoW and curriculum when the constraints of external examinations are still non-existent, to certain extent, by teaching three big topics per school year with key high impact structures, the seeds of the most sophisticated GCSE curriculum, repeated over the three year period of KS3, that is Y7, 8 and 9. Less is more!  I will write about curriculum designing and SoW in a later post.  By doing this, students would have acquired a solid foundation, although knowing fewer topics, but, on the other hand, feeling confident with, meaning that I can then "rush" more to cover the needed GCSE syllabus at KS4.

After many lessons, that's why we only teach a big topic per term at KS3, students become confident and start becoming creative and spontaneous with the language.  This is the stage when we can carry out projects, start collaborative tasks with partner schools etc.. The issue I see in many schools in the UK is that we tend to get to this stage far too early and start creative projects when students are not fully ready, leading to the use of Google Translate and the frustrations of us, teachers.

At this stage, I always, encourage creativity and explain any grammar, for those students interested, (differentiation) that automatically appears when trying to extend their own language and is new to them.  Many of the activities I prepared and carried out in the previous stage are relevant here too but with the expectation of free production.  At this stage I also incentive students to recycle previous language/topics/grammar covered.

These are a few of my favourite activities at this stage:

Oral presentations, via Flipgrid

Flipgrid is one of my favourite tools! Not only students can record their own videos, but they can do screencasting or apply a bit Bitmoji over their faces, which appeals to shy kids, increasing their confidence. I love Flipgrid too because, I can incorporate rubrics and give personal feedback in writing but also via my own video.  At Alevel, students are encouraged to respond to each others' videos creating oral discussions online which we can reduplicate in real life in lessons.  I always create a Flipgrid Grid for each of my teaching classes and different threads linked to topics/activities.  

Jane Basnett in her blog post here Even Better if  writes magnificently about the potential uses of Flipgrid and how it can be exploted, I will not repeat myself!


Creating short films/videos via iMovie

Students can create imaginative videos or movie based on a given topic using this app. However, in order for this activity to be successful, students need to have been orientated very well in the previous stages, otherwise the use of Google Translate will be far too tempting and the outcome, although technologically great, linguistically can be a fiasco!         

 You Tube Videos  (songs and film extracts, together with vlogs)

This is the time when I start using authentic resources via songs and film extracts via Youtube. I will have a specific post on use of songs and films at a later stage. Basically, I create my own activities matching my students' abilities and my well thought final desirable outcome for the activity: what do I want students to get from this?: learning further vocabulary, get a cultural perspective, practise a well studied grammatical structure, write a little review, write a complementary dialogue based on a particular section of a film, create their own song version matching the music etc...

Creating posters via use of iPads (PicCollage, Balloons + apps, BookCreator) 

I am lucky and I have a set of iPads in the MFL department to use conveniently for this task! However, students can create posters using any app they feel confident on their own computers. At this stage the collaboration between the ICT department and MFL can be vital! Students can use a given app studied in ICT for MFL content! I have seen great use of tools in ICT lessons with meaningless input in English, this can be changed by collaborating closely with different departments. 

We were also lucky to have Joe Dale training the MFL department on how to use different apps on our iPads productively in 2018! I thorough recommend his tailored training days! Also his Youtube channel, where he shares many webinars!  

I collected the notes and ideas on the use of different apps, from our tailored training on this document: 2018 Joe Dale training.

Creating talking avatars

There are many apps that can do this for you! Voki  is one I use on a PC, but if students are allowed their phones, there are many they can create, including their own Bitmoji! I particularly like Photospeak on the iPhone! Once these avatars have been created, I love converting them into QR codes by using any QR code generator. Once I created the QR codes, I share them in our school weekly bulletin, School Twitter account and print them in our MFL department talking wall.  This is a fantastic way to raise the profile of languages in the school community, increase students' pride and great for open days/evening/mornings. 
The same I do with the students' imovies.  

Creative writing using Padlet

At this point, I use Padlet! Padlet is a little bit like Flipgrid but for collaborative writing, oral etc.. Once we finish a topic, students need to contribute in writing and/or orally to a particular class Padlet.  I love this because it is fun, everyone can see each others' contributions and comment! I tend to do it for writing but also for videos, as an alternative to Flipgrid.  Similarly, Padlet is a fantastic tool to carry out collaborative projects with partner schools! I will talk about eTwinning and Erasmus on another entry!  Last year, we carried out an Erasmus project and Padlet was the tool that students used to communicate with each other and work together.

Similarly, Padlet can also be used for you, the teacher, to create a particular subject content wall or a revision schedule for GCSE.  In the free version, you can use up to 6 Padlets for free. As a department we have the paid version and it is money well spent! These are some of my Padlets:


 Boardgames based on general questions

A    Any of the games discussed in the controlled production stage are very valid here! but easier to prepare.  I normally do it with general questions relating to different topics where students need to answer openly without translation tasks. I tend to use this with key high impact expressions that I want students to incorporate in their answers to make the activities more challenging. My repertoire of ready laminated A3 boardgames are great here as well as my Jenga sets.  Also Speaking Dice from Linguascope are a great acquisition for a MFL department for this stage. Of course, the templates available from Genially and developed by Marie Allirot are great here too! Check out our MFLtwitterati Padlet here

          Speed dating

My students love this activity! I take them out to the corridor and place them in two rows where each student face another. They need to ask a set of different questions and ask them to their partner. At a sign from me, normally clapping my hands, students from a row only move towards the right facing a different partner and asking each other the same questions.  This is great for practising different questions/ topics over and over again but with different partners, which makes it more enjoyable. Students also follow the rule 3-2-1: answer questions in 3 minutes but then trying in 2 and finally in one minute to promote spontaneity.

Spiderweb Game

Another favourite!  I get an old wool ball and pass it to one student asking him a question. Student A answers the question and throws the ball to another student posing another question, or the same questions as you want to! but before throwing the ball they hold a piece of the wool, the next students does the same creating a spider web in the process!

Picture talk and 1,2,3

Students discuss a series of pictures, related to a topic, in a group. In order to do this, on my tables, I always have a mat with conversational entries to help them!

On a second stage, they need to move around the room talking to each other about a particular photo, which is displayed on the IWB.  The first time they do this they must talk for a minute, the second time, with a different student, two minutes, finally the third and subsequent times, 3 minutes. I change the picture each 15/20 minutes. Remember they would have worked with these pictures in their group talk first!                  

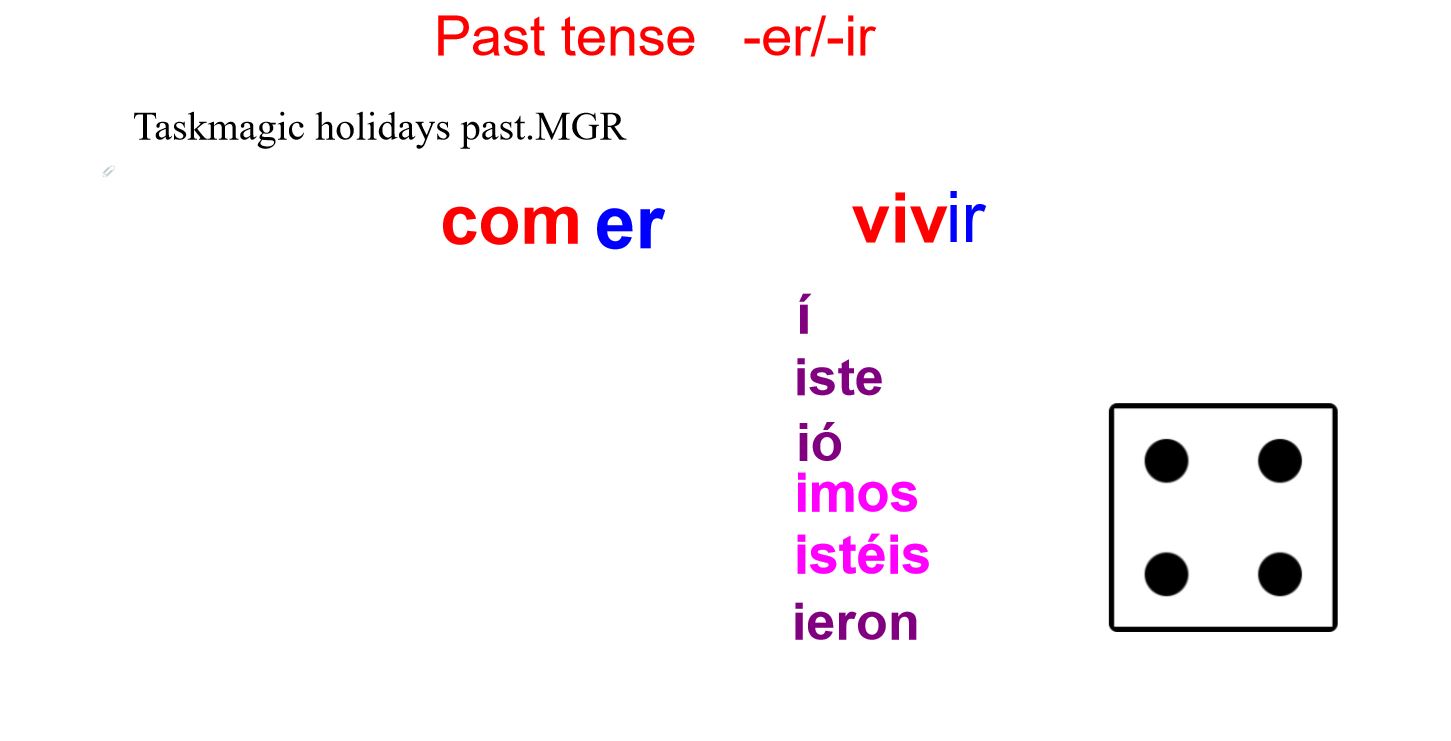
Piedra papel, tijera  evolution (free output)

Same as the game I explained in the Controlled Production stage post but now with free output based on a set of questions.

Dice games with free output

Same as the activities I explained in the Controlled Production stage post but, again, now with free output. Talking dice at this stage are also great!

A document detailing all types of activities for all three stages can be found here:


Tuesday 21 July 2020

Inductive Grammar: the Eureka effect!

At the last stage of the learning journey, after modelling and lots of practice (from input to output) of our Sentence Builders structures, I teach grammar.  However, I do not do it explicitly to start with but inductively. Once students have had many lessons, (several weeks) when they have been exposed, via modelling, to such structures, have practised and consequently memorised and learned our Sentence Builders well (where verbs in the I form mainly, but also in the third persons have appeared "casually" in a given tense), I show them a text featuring that particular tense or grammatical rule. 

By then, students can fluently talk and write about themselves and another person in the present, past or future about a particular topic, and because I have planted the seed for the use of a particular tense and most sophisticated language: “ojalá mi madre fuera”, understanding grammatical rules at this stage is easy and enjoyable for the students as they infer the rules to manipulate our sentence builders and start building their own content. It is the Eureka effect when grammar is welcome and embraced! 

This is the process I use, for example, to teach the Preterite Tense in Spanish with a Y8 mixed ability class, after a few weeks (between 3-6) carrying out tasks at modelling,  production and fluency stages, so everyone can talk about a past holiday in the I form, providing reasons and using some nice expressions: si tuviera la oportunidad me gustaría/ siempre he querido ir a or puede ser.

1. Students read a text with structures from our Sentence Builder but now including all the verb paradigms in the past for ar/er/ir verbs. (I always teach the verb IR in the past first, using this method the previous week). In this text I colour code the verbs I want them to focus on. With a high ability group this may not be necessary. I put them in context "El año pasado" and what we will be expecting! As they already know the first person well. Questioning here is vital! What tense we will find in the text? why? Which coloured words do you recognise? etc.. 


2. Working in pairs or groups, students try, first, to find out what the different colours mean prompted by me. What do green/blue/red verbs have in common?  Remember students have already been exposed to and know well,  the infinitive form of these verbs (Me gusta + infinitive) and the I/he forms.  Given students thinking time and clues accordingly, independently of their linguistic level, they always induce that red verbs are -ar  and green -er verbs.  Very good groups will also induce that the green verbs include -ir verbs and blue are irregular. This is great metalanguage talk! 

3. Once the reason for different colours has been established and everyone agrees that this is the past tense in Spanish, students are invited to induce in groups/pairs what is the rule.  At this stage, I may revise the endings for the present tense and remind them about endings in Spanish.

4. Students write down in mini white board their rules and the endings they could induce and we have a plenary session where all groups expose their ideas.

5. At this stage, I explicitly present the different endings and I complement their explanation of how the Past Tense is formed. Students are given the verb endings in a handout at this stage, for the first time after weeks of studying how to describe holidays in the past. With the interactive dice in the Notebook (picture below), we practise conjugating verbs they are familiar with, including ones from different topics.  The Notebook software also allows me to move the different endings around, which is ideal for grammatical explanations.  We focus on AR verbs, first (with low abilities this will take the whole lesson) and ER/IR verbs afterwards. We use the interactive dice to conjugate different infinitives and check for understanding. I do this, with low ability groups, via mini whiteboards or orally with high flyers.


6. We drill the endings! How? using Taskmagic! But you could use Flippity, Textivate or The Language Gym. The VerbGrid Mode in TaskMagic is perfect for this. I use the flashcard mode or this particular game to be played in 2 teams (connect 4) , orally:


7. We drill the past tense in full sentences not in isolation, modified from the Sentence Builders students have been learning, but now referring to my parent and I, my friends etc... To drill this, I use, again, the activities explained in my previous post but incorporating all persons. 

This 7 staged sequence does not take place in one lesson!  It would be impossible, but in several, as many as needed! Reading and Listening activities need to be incorporated too in the picture before stage 7 and after, for students really assimilate the grammatical structures.

The use of memory hooks, as Steve Smith call them to remember the different grammatical rules is key too!  For example, ABBA plays mama mÍA for endings in the imperfect, all my friends were called -ARON for the third person plural in the preterite. Similarly, looking at patterns is also extremely useful and a must: the fourth person in Spanish always has a "m" etc.. 

Over the years, I found this approach works!  High ability kids will conjugate verbs nicely and less able students are aware of the concept and can conjugate at least two more forms apart from the first person, which they can reproduce fluently, while recognising the other forms.  However, this will require constant revisiting: interleaving. 

A lexicogrammar approach, then, despite what some people argue, incorporate the teaching of grammar! and the analysis of  metalanguage.  The key is when this takes place and how! Rather than in isolation at the beginning of the teaching sequence it is taught as part of a whole continuum, at the last stage of learning, thoroughly planned and executed, allowing students to manipulate the language and start moving away from the sentence builders. By doing this, students do. It feel overwhelmed by the grammar but embrace it in the EUREKA EFFECT!


Sunday 19 July 2020

A Typical lesson sequence: structured production

After a couple of lessons where Sentence Builders have been introduced, language has been modelled via different activities and students have started learning/memorising the key vocabulary via Quizlet/Memrise and the range of activities withing the introduction stage, I spend the following lessons carrying out structured production activities whose aim is to increase students' confidence and develop, above all, oral skills. At this stage, retrieval practice is key and the IT tools discussed in my previous post (LearningApps, Flippity, Genially and Quizizz) would take place now, although these will not be the only ones!

These are some of my favourite activities at this stage:

 Stealing sentences (level 2/3: reading with strategic gaps/ translating with initials) Thanks to Gianfranco Conti for the idea.

This is the same activity conducted at stage 1, however, at a second level, students do not just read the sentences they need to steal, but read them with gaps (level 2) and translate them from a list with initials for support (level 3). A fourth level could include initials only!  Below there are two examples on the topic of Transport for a Y9 class.


  Battleships

This is one of my all times classic activity!  I do this activity for listening but at this stage, for oral practice as a way to put Sentence Builders into practice.  The beauty of Battleships is that they can be very, very simple or very, very complex!


Battleships is also great for grammar practice and drilling verb tenses once grammar is explained during this stage. 

Dictogloss

Dictogloss is a classroom dictation activity where learners are required to reconstruct a short text by listening and noting down key words, which are then used as a base for reconstruction. I love this activity because it is a multiple skills and systems activity. Learners practise listening, writing and speaking (by working in groups) and use vocabulary, grammar and discourse systems in order to complete the task.

I sometimes carry out the activity doing the dictation myself but my favourite mode is when students work in small groups or pairs as follows:

1. One student reads a text prepared by me based on the Sentence Builders we are working on and will take notes in English (not literal translation)

2. Working in pairs, student one, using their English notes, will reconstruct/dictate the text in Spanish to student two. Student two will  write in Spanish the text they hear. As a final task, both students will look at the original text and compare both versions.  

I do use this at all levels by adapting a given text. An example on the topic of Jobs is below for a Y11 class. I tend to prepare two texts so all students have the chance to be speakers! Students then exchange information, this way Dictogloss becomes an information gap activity.


Finding someone who…

Teacher prepares pairs of cards based on the Sentence Builders we are working on. Students need to find the person with the same card as them by asking/ translating the sentences/paragraphs displayed on their cards. 

 Information gap activities

Any information gap activities are a great way to practise Sentence Builders and engage students.  They can be very simple or very complex depending on Year group, ability etc... This is a complex example for a Y10 class.

Guess who/ where

This is a version of the original game but instead of physical descriptions students need to find out subjects people like, details about their holidays, jobs the do, views on environment etc..  This is a great way to practise questions too!

Translation Board Games

Any game based on translations of Sentence Builders are great activities: Snakes and Ladders is one of my favourite.  I have a set of 10 A3 laminated Snakes and Ladders boards that can be used with any topic.  I also have card sets with English sentences and correct Spanish translations at the back from all topics, based on my Sentence Builders (for this task our Spanish assistant is wonderful!)   In order to advance, students need to pick up a card and translate it. Partners play in pairs or groups of 3/4.  They can get instant feedback as the correct answer is at the back of the cards. I use the same principle with Jenga.  I have 10 sets of this classic game to play while practising key structures.  To make this activity more challenging, I have a set of high impact expressions cards to pick up from.  Students then need to translate a specific card and extend the sentence by adding the high impact expression students picked up. I also recommend to invest in a couple of garden Jenga games!  In the summer we play this game outside!  Y7s in particular love it!

Duck/frog stick walk, thanks to Jennifer Wozniak for the idea.

Prepare a set of 15/20 rubber ducks, frogs or just sticks with a number each.  On the board display the numbers with translations by the side.  Students come to the front, pick a duck/frog/stick look at the number and translate the sentence with the number in display.  When done, they return the item and pick another one. The team who completes all the translations from the board the quickest wins!

Oral translations Ping-Pong, thanks to Gianfranco Conti

As in translation board games, students work in pairs. They have each a set of translations which they must translate taking turns while their partner will check if the translation is correct. This is an example for a Y9 class on the topic of transport.


Translation with Dice

This a minimal preparation activity that works great with students. There are lots of variations to this activity but basically, I prepare 6/12 sentences or key words on the board attached to numbers 1 to 6 or 2 to 12 if working with two sets of dice.  Students work in pairs or groups by throwing the dice and saying a sentence with the key word which corresponds to the number in the dice/s or translating the sentences. It could be question words on the board, sentences to be extended.

Translation with metalinguistic structures, thanks to Gianfranco Conti

Students work in pairs and translate different tenses, I display them on the board, but they must also categorise the language in them: subject, verb, reasons, direct object etc... This is great to make students aware of different grammatical concepts which in many cases, they are not aware of even in English!

Pyramid translation, thanks to Gianfranco Conti


 Piedra, papel, tijera, evolution, thanks to Rachel Hawkes

This is the classic game, paper, stone, scissors!  Students play the game and who loses need to translate a particular sentence or answer a question.  I use my set of cards for this activity too, so the answer is at the back of the card.  If the student translated correctly they evolve from egg, to chick, to bird, to elephant to superman, if they get it wrong they stay the same. The person who gets to Superman first wins!

At this stage I use all the activities discussed in my previous post using LearningApps, Quizizz tasks, Flippity, Wheel of names and Genially. 

Also, for PPT users, check these PPT game templates to practise language as a whole class activity.

Inductive Grammar

At the end of this stage, once students know their Sentence Builders well and have practised them via listening, reading, oral activities, I teach grammar inductively. I will leave how I do this for another post, though.
At


Saturday 18 July 2020

More on Retrieval Practice: LearningApps, Flippity, Quizizz and Genially

Retrieval Practice is essential to make lessons stick and transfer information from students' working memory to the long memory. There are many ways to do this, being the art of posing questions the most common ways to achieve this. I will talk about questioning in MFL in another entry but as I wrote about TaskMagic and Textivate in my previous post as essential IT tools to carry out retrieval practice, I will continue with other apps which help with memorisation and independent learning (self-quizzing) in my students.  I use all these three apps as homework assignments, in the language lab/ IT suit or even in the classroom if students bring their own device.  They have also being instrumental during my asynchronous online lessons during lock-down.

LearningApps

This must be one of my favourite tools/apps of all times! LearningApps is an online tool which allows you to create a wide range of activities within minutes, including listening! save your activities and share them via a link or QR code with your students.  Why do I love it?
  1. I can create my own activities, meaning, tasks around the Sentence Builders we are working on during lessons. This means I can personalise the exercises to specific sets and/or specific students if I choose to do so.
  2. Students do not need to create an account to work on the activities! There is an option for students to open accounts and I can create classes to overview progress but I choose not. Kids already have many usernames and passwords and I do not want to create more. Normally, students will do a screenshot of their completed activities and paste it into our  class OneNote. They love that I trust them!
  3. It is extremely easy to share via link, QR code or by embedding the activity, which will allow me to incorporate them to other tools/apps such as Genially. 
  4. There is a very wide range of activities and unlimited use!
  5. IT IS FREE!
My favourite LearningApps task is Free Text input.  This allows me to create translation activities from English into Spanish, with my famous initials as support!  I find this exercise extremely powerful if done from memory!  Free Text input also has text-to-speech functionality, which means I can create dictations for students, which again, is very useful for listening practice.


I can also create a matrix of activities for students progressing in difficulty or incorporating different skills.


Flippity

This is another great tool which I found out about during lock down thanks to the wonderful Joe Dale. Flippity also allows you to create excellent activities aimed at Retrieval Practice. There is a wide range of exercises to choose from! I particularly love Scavenger Hunt! The Randomizer tool is also great for Sentence Builders! Vincent Everett and Mike Elliott have come up with lovely ideas on how to use the Randomizer as a machine to practice chunks for reading/speaking practice. 

This is Mike Elliott's video tutorial on how to use this app in conjunction with Flipgrid for oral practice.

This is Vincent Everett’s example 1 and example 2 on how to use the app for reading and writing.  Vincent suggests to spin the tool to make a sentence in Spanish. Students then write it down and translate into English. Students use the nudge to make improvements and repeat the process. At the end they buikd a paragraph out of your sentences.

Wheel of names is also great as a Randomizer to be used in whole classroom activities from the IWB.


Quizizz

Quizizz is, in my opinion, the best Quiz App for teachers and students out there at the moment. Why do I love it?
  1. Students do not need special login to do the activities
  2. It allows you to create different types of quizzes, not just multiple choice!
  3. You can incorporate listening (up to 10 seconds) which is great to create listening/ dictation exercises to help students memorise Sentence Builders. This is an example of a listening Quizizz activity.
  4. Students can do the quizzes live but also as practice as many times as they want to which develops independent learning!
  5. You can create short answer quizzes but also long answers!  I use the app very successfully to practice model potential written answers to oral questions.  This is an example of an oral Quizizz activity.
I use Quizizz for homework assignments and for activities within the classroom. For me, the beauty of Quizziz is how it can develop independent learning by making students use it for self-quizzing. You can also create your own classes and monitor progress. 

Genially

 Genially  is a fantastic tool which I discovered thanks to Carmen Quiros and which allows you to create info-graphics, great presentations and a nice range of games via Escape Room templates and Board Games. Escape Rooms can be time consuming to generate, I will not lie but, this app offers great templates to use. In our MFLtwitterati Padlet, there are many examples of great Escape rooms using Genially! What I like, in particular is that in Genially you can embed the activities from LearningApps as one of the challenges or the links from Quizizz so you can end up with a very comprehensive activity very well planned with different skills. 


Within Genially, you can also find Game Boards.  I used these for synchronous lessons during lock-down with my Alevel classes which, sadly, do not have many students. Students advanced around the board by answering specific topic questions in Spanish!  I can see this working very well in my classroom IWB and with big classes too, working in teams.  For example, students will advance positions after  translating specific input, orally, based on Sentence Builders (Retrieval Practice in a different form!)


Of course there are more apps/tools to use!  For example Quizlet/Memrise which I actively use to assist students in their learning homework.  However the apps above go beyond the flashcard format and are examples of IT use in a meaningful planned way not just for the sake of it!


Retrieval Practice and TaskMagic

I wanted to spend some time talking about the potential of TaskMagic, an old but timeless tool which seems to have disappeared from the MFL classroom.  For me it is a classic! After the introduction stage of Sentence Builders, it is paramount for me to plan retrieval practice in lessons. In fact, my starter activity, which sometimes is not a starter as it can last as much as twenty minutes if needed, is to revise the language introduced/practised in my previous lesson.  For that purpose, TaskMagic is ideal! 


TaskMagic is an IT tool that can be bought as a whole School licence for £350 +VAT.  I think it is value for money!  Once bought it can be installed in all school computers as a standalone purchase. 
There are many activities that can be created with this wonderful piece of software. My favourite is Text Match for retrieval Practice.
In the Create Mode, I insert sentences based on our Sentence Builders in English in one column and their initials in Spanish in the second column.


When the file is open in the Play mode, I have a wide range of activities at my disposal for Retrieval Practice and worksheets! I use the activities as whole class tasks in our IWB. My favourite is Flashcards. 


I use the Flashcards activity in conjunction with mini whiteboards or orally: students translate the different sentences using the initials as support.  This can also be done, very quickly orally once students have memorised our SBs.  Students can also extend the display sentence with something that makes sense using a different tense. The sentences can also be an opportunity to talk about grammar, revise verb endings etc.. (metalanguage). With high ability groups, I display first the initials and then the English (developing thinking skills).

I love TaskMagic and I use this tool all the way to KS5: I display key vocabulary, structures that students need to use in a long sentence on a given topic. I display sentence starters that students need to finish using the subjunctive or any given structure. I use single words that act as a springboard to think about other words within the topic, antonyms, synonyms, word families.  

I love TaskMagic in the classroom because it takes 5 minutes to create tasks and I can squeeze hours of activities!  I also use the Worksheets for homework and self-quizzing, again another way to put retrieval into practice.  TaskMagic works amazingly if planned well and interleaving vocabulary from past topics! 

Grid Match is great for Verbs and whole class games!  

I delivered a TILT workshop a few years ago on innovative uses of TaskMagic and I created this Booklet with all the activities I normally generate with this tool. 

The developer of TaskMagic, Martin Lapworth, has also developed Textivate.  Textivate is similar to TaskMagic but an online/subscription tool. It is also great! and you can use it in the same way as TaskMagic.

Click on this video to see the differences between Flashcards in TaskMagic and Textivate

I find both tools excellent apps for retrieval practice for the classroom.  Textivate would be better for individual practice.  Both tools complement Quizlet, Memrise and Quizziz perfectly!  I will talk more about these other apps and retrieval practice in a different entry.  Many schools have TaskMagic in their shelves and it has been forgotten!  Shake the dust and use it!

Friday 17 July 2020

A typical lesson sequence: Introduction stage (Modelling)

never plan individual lessons but sequence of lessons. Advantage, sometimes I can plan up to 6 lessons in one go! Disadvantage, it can be time consuming if you teach from Y7 to Y13! 


When I teach, I always use Smartboard (Notebook 11) Software and I plan nearly a whole topic with as many slides as possible. I personally do not like PPT as it is too lineal for me, although it has its values and it can be good for some games. On my Notebook, I insert all links to all tools I will be using throughout the teaching of a particular topic: from TaskMagic (I will dedicate an entry to this wonderful tool as it is really undervalued) to Wheelofnames, Flippity to Quizziz. I can end up with up to 50 slides for a particular topic.  

My Notebooks include all activities covering teaching/learning stages: Introduction of chunks, controlled production/practice and free production or spontaneity.  On this entry I am going to concentrate on the Introduction/Modelling of a given corpus of Sentence Builders (SBs).This is a typical sequence:

I introduce/model SBs on my Interactive Whiteboard, using my Notebook (below an example of a SB for the topic of Holidays (Y10 low ability group). Students also get a printed copy of this. I do not introduce all this corpus in one lesson but two or even three/four lessons: less is more! as it is important to avoid cognitive load.

In this particular example, I introduced reasons in a third lesson as I spent two lessons introducing the activities and practising the vocabulary via listening/reading exercises.

To introduce these SBs, we do choral repetition, lots of modelling and translations using mini whiteboards (an old favourite) from Spanish to English and vice-versa. At this very early stage, I start using  a competition element among students: who can answer first (after giving some thinking time), tennis choral repetition (girls versus boys or just two teams in the class) or just awarding a sticker for every three correct translations. At this modelling stage, I like checking for understanding from all my students so the mini Whiteboard is and ideal too to do this.  


This is the list of activities I normally use throughout the Modelling stage for two/three lessons:

  • Translations from Spanish into English (using mini whiteboards in conjunction with TaskMagic (Flashcard type)

  •     Spot the missing word: I say a sentence from the SB sheet but I do not finish it, students need to write on their mini white boards the missing word or words! Sometimes anything can be good as long as it makes sense!
  •     Dictations
  •     Spot the mistake in listening activities: I read a text with differences from an English version and students need to annotate the mistake.

    Arrange the sentences in the order you hear them

  •     Delayed Dictation: like normal dictation but students cannot write down what they hear after a few seconds, 
  •     Stealing sentences (level 1: Reading/ gap filling) This is a Gianfranco Conti's classic and it works! Students write in 4 pieces of paper different numbers in relation to the sentences on the board (one number per paper) and start reading random sentences to each other. If students have the number of the sentence that is read to them, they must hand out their piece of paper. The winner is the student with the largest number of pieces of paper.


  •      Battleships Listening: I say sentences in Spanish and students write the coordinates of the sentences I say.  Great Listening/Modelling activity!

Finally!  After I introduce a set of SBs, students always, for homework, must learn these SBs. To help them to do so, I create Quizzlet (for KS4) and Memrise (for KS3) courses with the SBs we work with in lessons.  This promotes retrieval practice and independence in my students.


My Pedagogic Journey

I started teaching MFL: French and Spanish in 2000.  Previously, I had completed a PGCE where I was taught all the "tricks" to teach languages under the Communicative Approach umbrella. The teaching sequence, then, was divided in three clear stages: Introduction of vocabulary (via old fashioned flashcards), practice of this vocabulary and production. Grammar was introduced, inductively, and the production stage should include as many communicative activities as possible to make learning the language purposeful. The intention of this approach was clear and I taught MFL in this way for a few years very successfully, indeed!  However, there was not clear guidance on how we could pass from the practice stage to the production level, while grammar was a big taboo, as well as translation! 


Avoiding direct translation activities was a big problem for me. Until you master a language, isn't translation the force?  It was definitely for me, as a linguist! I ignored this "phobia" of the Communicative Approach and I based my teaching on a strong translation foundation. I remember that as PGCE student I was observed by linguist Ernesto Macaro, from Oxford University, and he admitted that my lesson did not follow the Communicative Approach but it was outstanding and extremely effective, based, mainly, on translation tasks. This increased my confidence.

After a couple of years, I noticed that high achievers always did well in MFL.  However, lower ability students tended to not like languages and could not put vocabulary + grammatical rules into practice spontaneously, so they could hardly ever achieve the Production stage.  Also, I noticed that most high flyers could hardly speak Spanish freely!  By impulse, I started introducing "chunks" in my teaching, normally, the "I form" of different verbs (in different tenses) + direct object + reasons. Students would learn these by heart after lots, lots of practice in lessons: oral repetition and many, many games (my Communicative Approach legacy) based on translation, I noticed that all students started feeling confident, could speak in a given topic and use a range of tenses after just a few weeks.  Grammar would come afterwards!  

I started incorporating, then, thinking skills elements in my lessons.  At that point I had attended a wonderful CPD course led by Barry Smith who changed my teaching career forever. I remember that he told us how adolescents went from lessons where they were required to put into practice high order thinking skills and answer big questions, such as, does God exist? in a RS lesson, to repeating for 20 minutes after a flashcard "J'ai un lapin".  No wonder, they did hate MFL!! How boring! it was insulting!  However, their linguistic level would not allow them to discuss big questions, only in Y11 and at Alevel we can start doing so! What could we do, without resorting to English and making MFL a General Studies subject?  The answer was to make them think! To make the learning of MFL a positive challenge where they had to think, Barry talked about the power of translation (Yes!), use of initials, learning chunks and carrying out activities that did not insult our students's intelligence by repeating "J'ai un chien" for 20 minutes!

I combined these two visions: use of chunks and thinking skills and started creating my lesson sequences based on these. I would still use the structure: Introduction (now of chunks), Practice (now, controlled production based on lots of retrieval practice, powerful questioning and use of games and competitions aimed to memorise and assimilate the chunks), Production (now, creative production where grammar was explored and most students started to manipulate the language freely). Some weaker students could hardly master the production stage but all felt confident and most of my students would enjoy MFL.  

This formula has worked for me beautifully, and it is complemented by a wide range of extracurricular programme, based on exchanges, trips abroad, eTwinning projects and cultural aspects, such as use of film or music.

Later on, it was wonderful to read The Language Gym blog, by Gianfranco Conti, as he institutionalised under the EARS MARS approach and the use of Sentence Builders, what I was doing in an instinctive and  unstructured way. Gianfranco's approach, as well as Parallel Texts and Teaching and Learning big theorists such as Rosenshine, inspired my teaching for the best and I started using explicit Sentence Builders, modelling and explicitly interleaving content in SoWs.

What you will find here, is the product of this pedagogical 20 years' journey! What has worked for me, my reflections and my resources. The journey is far from complete as I learn everyday, especially, during this academic year and the Covid "lock-down", which has shaken my teaching, for the best, and has allowed me to meet, albeit virtually, some of the best MFL teachers in the UK and beyond!  Thank you!

Making instant Google Form Quizzes with AI to practise the productive Skills (GCSE ORAL/WRITING EXAMS)

Happy Easter everyone!  I thought I would share with you a short post on how to use AI to create Google Forms Quizzes in seconds, using the ...