Showing posts with label Onenote. Show all posts

Saturday, 8 May 2021

15 Onenote Tips to maximise your students' learning experience and SAVE YOU TIME!

I love Onenote. It is such as great tool that allows me to carry out blended learning seemingly, saves me time, allows me to connect with my students easily and to bring my teaching to the 21st century. 

Most importantly, Onenote helps me take my subject, MFL, outside the classroom and maximise the learning experience of my students outside my four teaching walls! 

Ultimately, Onenote contributes to develop independent learning skills in my pupils, my ultimate goal!

On this post, I am assuming, you know how to create a Class Notebook within Onenote and you have one already set up. This post will focus on how to use your Onenote once this has been created by sharing with you my 15 top tips.

1. Think carefully on how you are going to structure your Content Library. 

Ideally, this should be a departmental approach. How many sections are you going to create? What will be their names? This should match your teaching methodology and Schemes of Learning/Work. In my case, I have a section for each topic I teach called: Lessons + name of topics, another section for Grammar, Blooklets, Sentence Builders, Revision Work and Subscriptions to external sites, such as Languagenut, This is Language, The Language Gym or my Quizlet folder. See my example below. 

Remember that the Content Library cannot be edited by students but anything in it can be seen by them, so if you do not want to release the content of a lesson, I would advise you to store it in the Teacher Only section of your Onenote, just below the Content Library.


2. Have a page for each week's lessons. Within my lesson sections, I create a page for a week's worth of lessons rather than a page per lesson. Sometimes there is too much content so I create a second page for an individual lesson and make it a subpage of the main week. This way, it is easy to find your lessons and it minimises your work considerably!  I store my lessons in the Teacher Only section and paste it in the Content Library when I want to distribute them to students.

3. Have a template for your lessons which you can store in the Teacher Only section. In my case the template includes a picture of my Interactive Classroom, which I created using Canva, which personalises my Onenote and makes it more colourful and attractive!

4. Populate the sections of your Content Library, little by little, with reference materials that support your subject, treating it as an area for the ultimate independent learning experience for your students!  What will your students need to support their learning and provide scaffolding? In my case it is grammar explanations, links to sample oral questions, oral booklets, translation booklets, our Sentence Builders with direct links to Quizlet courses. Any materials/booklets you would give to students, can go here, including self-assessment areas! You will save lots of time and paper in photocopying! Think of this section as the door to Independent Learning and teach your students to use it and become independent. TOP TIP What about using this area for your own video tutorials on modelling or explaining a difficult concept? You can use LOOM.

5. Use your Onenote as your teaching planning tool! I don't use a Teacher Planner anymore, as my lesson plans are in my Onenote: per week, per group, with all links to PPTs, Word Documents, external links to quizzes, Youtube Videos... It saves me time as all is in one place, which anyone in the department can share, so you can reuse each other's resources by tweaking content to match individual classes. Most importantly, you can reuse lessons from previous years too just by copying and pasting your old pages.

6. Use Page Colour when populating your page and different fonts/bolding/highlighting bits to make your lesson content attractive to learners. I also, advise you to use the Tags option on Onenote for students/you to tick tasks which have been accomplished, or classify tasks within a particular skill. MAKE YOUR LESSON ATTRACTIVE!


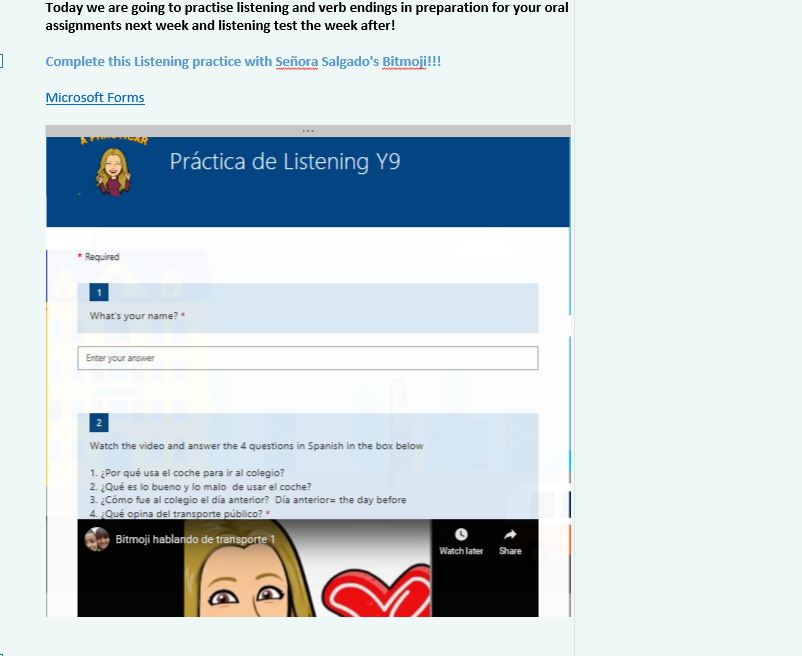
7.Remember that any Microsoft file will embed into your Onepage, as well as some external files, such as Genially or Youtube videos. That will make your lesson interactive and will allow your students to access such material nicely during your lesson and outside the classroom!
In the case of URL based material, such as MS Forms or Youtube videos, just copy and paste the URLs into your Onenote. In the case of MS files, just Go to Insert, file, choose your file and then, "Upload to Onenote and insert link".  

TOP TIP  Take advantage of this opportunity and think outside the box! You can also Insert external Links, as well as links within pages in your Onenote (remember the Content Reference Library?), so an opportunity to think outside the box: How can you use other external apps such as LearningApps, Flippity, Wheel of Names, Quizziz or Genially to maximise learning? I add links to all these apps directly to my Onenotes. I explain how I exploit these apps in blended learning in this blogpost.


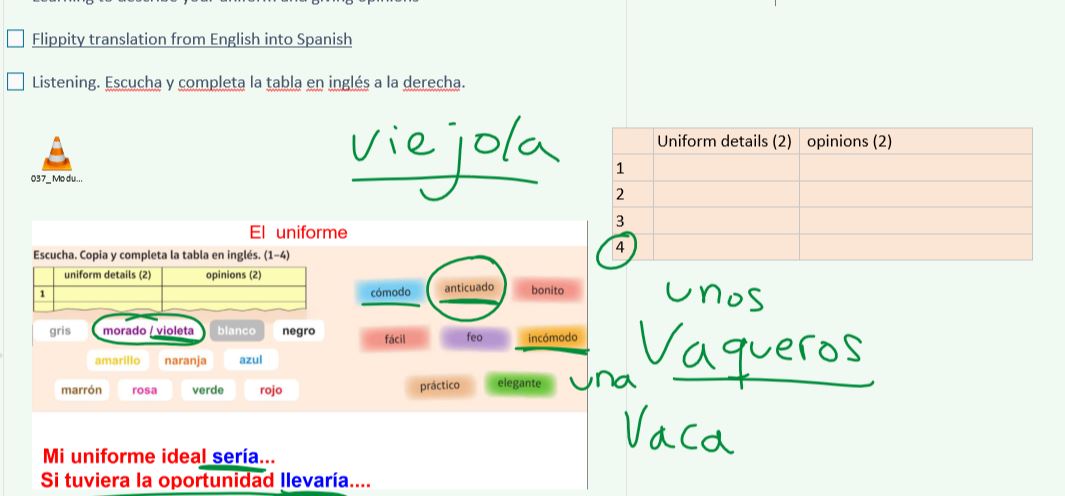
8. Use the Snipping Tool app to select sections of a textbook, website etc.. that you want students to work on and paste the content onto Onenote. I use this all the time and it is extremely useful for a particular reading or listening activity!


9. TOP TIP!! If you want students to respond to questions, etc.. Create a Table for them to write answers on. Look at my example above, where I pasted a section of a digital textbook into Onenote with Snipping Tool, for a reading task, and then created a Table for students to write their answers in. I always change the colour of my Table to make it stand out!

10. Do not reinvent the wheel! Use all your PDFs, Word Worksheets interactively in Onenote. For that, just insert them but, instead of choosing the option shown in Tip 7, choose "Insert as printout". This will insert a copy of your document as an image (an image per page). Once this is done, right click on your image and set it as background. That way, students can either write on it directly, with a digital pen, or just type their answers! This is very useful in the case of Exampro materials, where students just type in their answers directly into the worksheet. 


11. Give feedback by Inserting an Audio, or ask students to give you oral answers to questions! This will save you lots of time when Marking!!

12. Use the Stickers within Onenote to provide feedback! They are under Insert and you can add your own text. Once created, you can save your sticker in the Teacher Only section to use later! 

TOP TIP  use the Windows+V option to access your clipboard of copied images when marking, which allows you to find your recent copied feedback stickers, for example, and just paste them when marking, without having to go to the Teacher Only section to find the sticker you need! Why don't you try to use your Bitmoji as a sticker for Feedback? See example above too. 


This is my presentation from a TILT Webinar a delivered last March on Feedback using Onenote, with lots of tips!

13. Distribute your pages to your students weekly, that's why I tend to create a page of lessons per week, so I only need to distribute one page per teaching set. This means that students get a version of your distributed page in their own section for them to edit and work on. 
TOP TIP if you make a mistake or change your lesson plan, you can delete a distributed page easily and you can also distribute pages to particular students!

14. Use the Review Student Work function when marking. This is under Class Notebook on the top of your onenote and it allows you to go through work really quickly! It only works with pages that you have distributed, not created by students, so if you want to use this function, make sure you distribute the page where you want students to work. In my case, it will be their lesson page.

15. Finally! When setting up your Class Notebook, think about the sections you want to see in your students' areas.  Structure this for them and explain to them how they are going to work, which sections to use for what and the rationale behind! In my case, I have a section for each topic (lessons), a section for Sentence Builders and a section for Prep/Homework. Students can always create their own independent sections, which I encourage them to do, but with a rationale. However, you can only distribute pages to previously created sections by you.

For a video demonstrating these tips this is my Onenote Tutorial 


ENJOY ONENOTE AND THE BLENDED LEARNING EXPERIENCE IT PROVIDES!

Saturday, 6 February 2021

Teaching in Times of Covid: Providing Feedback

I have just spent my Saturday morning attending the Linguascope Annual Conference, this year online, and I am buzzing with ideas and inspiration!  So many great teachers in the MFL community! Similarly, this week I have been thinking about how I am providing feedback to my students online. I wrote a post on Feedback, which you can visit here  a few months ago, but on this post I just wanted to focus on online feedback.

I see that many teachers are using MS or Google Forms to minimise marking, or platforms such as Quizlet, Quizizz or even Blooket to collect performance data from students, which I think is brilliant, but how do we comment on this performance?

I think, providing feedback and making a personal connection with our students is essential in the current climate. Students are working more independently than ever on set tasks and it is so important to reassure them on their work and make sure that they take pride in the work the carry out and for that, feedback is essential.

These are some of my solutions!

1. Give verbal feedback when possible. Not just because it is fast for you but it is lovely for the students to hear your voice too!

If you are using Onenote, this is a must! It is incredibly quick to provide feedback about anything the kids are doing and they really appreciate your voice talking to them. If you do not use Onenote, consider using Flipgrid, where you can record your feedback, which can be shared via a QR code or a link.

 Also Vocaroo is brilliant for this!  What about using a Vocaroo link with a Congratulations Certificate? I sent this certificate last lockdown and I have a list of students for a new certificate to be sent next week. I created it with Canva Daniel Warren also uses Canva Certificates for her students. I email them to students and their parents. 

Qwiqr is another option for video, audio, text or web feedback, linked to a QR code that you can share with your students via email, for example. Adding a Qwqr, Flipgrid, or Vocaroo QR code or link to your Canva certificate would make it extra especial!


2. Use pre made stickers using your Bitmojis. Kids love this! You can give Merits, Alphas or whatever system your school uses to provide feedback. I have a lovely repertoire of these Bitmojis in Onenote which I just copy and paste as needed. 


3. Use personalised stickers from Onenote which you can prepare with a rubric. In my video on Top tips to use on Onenote, I show where to find them and how to insert them. Click here for the tutorial. 

4. Use the Window + V shortcut!  This allows you to copy many stickers with different pre-set comments and when clicking on Window + V, all your copied options will be there for you to select the one you need to. I learned this tip, literally last week, from Becky Jones, who shared this Youtube tutorial on twitter.  I think this a game changer to be super quick! Tutorial here from Becky Jones. 


5. Finally, encourage your students to interact with your comments!  Have they understood? What are they going to do to move forward? Close up the circle with their commitment to set themselves targets!


6. Use live verbal feedback and encouragement via Teams. This is the easiest and most obvious way to keep students motivated. Use Teams to give individual feedback in Breakout Rooms, go over a particular piece of work with a particular student, and have that special 5 minutes time with your individual students every so often. Also, give and encourage your students as a group!


Wednesday, 30 December 2020

Online Teaching: Tips to save time!

This is a short post to give advice, after lot of people asked for this in private messages, about how to manage time following the approach I suggest in a previous blog (hybrid approach between synchronous and asynchronous teaching via the use of Onenote and Loom/Screen Casting lessons). 

My Golden Rules to be time efficient!

1. Use a platform to share your resources, mine is Onenote, but it could be Google Classroom, Canvas, Sway, your School Website or even Padlet and stick to it! Padlet is a great alternative as it allows you to embed content nicely! 

2. If using Onenote (I thoroughly recommend it), create a template of your lesson/lessons (a Onenote page) and copy and paste it for subsequent ones. In my case I always have a picture of my virtual classroom and a description of what we will be covering that week.


3. Plan activities for a week's worth of lessons, it saves time! Distribute the work at the beginning of the week.

4. Combine the work on Onenote, or any other platform, with Teams so that you can give instructions at the beginning of the lessons and do a whole class fast Starter/ Plenary activity.

5. Reuse resources you already have! Your word worksheet can work fantastically well with Onenote, for example. If you insert any Word Document  as a Printout on Onenote, and make the image background, students can just write on top of it: with a digital pen or typing! Also you can just use PPT and record a voice over or just use your PPT with different hyperlinks to your activities, which you can share with your students directly. In that way your PPT  be becomes your platform (Virtual Classroom) Start small!!! If going for the PPT route, check slidesmania as it offers many great FREE PPT templates which will make your content stand out! 


6. Use Snipping Tool! (IT IS PART OF WINDOWS 10) With this app, you can screenshot any  section of your digital textbook, worksheet, PDF past paper and save it as an image which you can then paste into Onenote or any other tool, such as PPT, word, Canva etc...


6. Think of ways to practice the language in an interactive way to engage students: Quizizz, LearningApps, Flippity, Wheel of names, MS Forms/Google Forms, Deck Toys, Genially, Padlet, Screen Casting and Flipgrid are brilliant options for that and just add the links. 

7. Do not reinvent the wheel!:SHARE THE ABOVE RESOURCES WITH YOUR DEPARTMENT. Teams or a Departmental Onenote with resources for each Year group is great for this. Also, make sure all teachers in your department do have access to each other's Onenotes so that they can copy and paste ideas and resources from each other. 

8. Use as many platforms as possible that would help with your marking: Google/MS Forms, Quizizz, Quizlet, Deck Toys and LearningApps are fantastic for this! So they are a great alternative for H/W tasks. Also, why not giving students the answers and they mark it themselves in another lesson? Carousel Learning is also fantastic for that. 

Remember, you are creating lessons that you will be able to reuse in consecutive years in a blended learning environment! IT IS A DEPARTMENTAL INVESTEMENT! YOU WILL SAVE A FORTUNE ON PHOTOCOPYING WHEN YOU ARE BACK TO FACE TO FACE TEACHING!

Look at this post about how to blend learning. 

Saturday, 7 November 2020

How to Blend Learning?

Blended learning, we have definitely heard this term over and over again since the first lockdown when schools were shut, as the future of education. 

What is Blended Learning?

The way I see it, Blended Learning means that students learn through the combination of face-to-face and on-line teaching methods, all blended into one, to maximise their learning experience. In other words, learning occurs via traditional methods, such as worksheets, Question and Answer sessions, activities via a textbook or a worksheet, combined with the use of IT tools which, via careful planning, help students in their learning journey. 

When I think about Blended Learning, I think about the different spaces where learning takes place and the different ways in which such learning can occur. 

Why different places for learning?

Students do not just learn in the classroom, they may learn on the bus, at home in their bedroom or during a school trip. They can access knowledge from any space, as long as they are doing a learning activity, like the school trip example, or, most importantly, have a device from which to carry out learning! That's why when blending learning, I think carefully, where students can access different activities.

Why different ways of learning?

Practice is key in learning and making progress. However it can be tedious to do such practice in just one way, say via worksheets using paper and a pen. This can be the case for young learners, who are bombarded with stimuli and immediate feedback experiences via technology at all times: you like a series, you binge it and watch it all! Accessing information and learning via videos, online images or collaborative tools can be extremely engaging and productive.

Blended Learning, allows me to take the learning experience outside the classroom if and when students or I choose to do so and teach in many different ways, which in the process, allows me to revisit content over and over again from different angles, without a feeling of repetition or dejá vu. This experience, in exchange, engages my students, makes them more independent, more involved in their learning process and, ultimately, makes their learning more in tune with their 21st century experience.

How to Blend Learning?

Planning a sequence of lessons:

  • First of all, I  would advise to have a vision of what you would like your students to achieve by the end of series of lessons and move backwards from there. For example, to be able to talk about their holidays last year.  
  • Secondly, think about what elements do your learners need to get there? This means structures, including vocabulary and grammar. A Sentence Builder with the potential sentences that students should be producing/understanding by the end of your sequence of lessons can be extremely powerful or just a model text. 
  • Finally, think about how are we going to take them there? What steps do we need to plan for the students to practise and embed our planned structures? It is, in this final step where we can blend learning!
Elements for blending learning

  • Use an online platform with your students so that you can share your planned activities, aka, learning steps, with them: Google Classroom, Firefly, Onenote/Classnote, Teams are the most common platforms, I believe, schools are using. 
  • Plan the activities for your lessons and think, at each stage, which and how IT tools can assist you and your students to enhance the learning experience. For this I have a list of potential IT tools that I could use at any stage. You do not need to use them all but it is important that you are aware of them.

In my case my Blended Learning IT tools ready at my disposal are these:

In the centre I have Microsoft 365 as the core of my blended learning classroom:
Onenote
Teams (for remote teaching)
Onedrive
Flipgrid
Forms
Sway
Word/PPT
These main apps are supported by Firefly (our School Virtual Learning Platform) which I use for online libraries for my students, not class specific, and Smartboard Software for the delivery of in-class lessons.

Finally there is a wide range of apps and tools that I can use for my teaching and students' learning: 
LearningApps, Quizlet, Wheel of Names, Flippity, Loom, Peardeck, Memrise, Genially, Quizizz, Edpuzzle, Padlet, Canva, Mentimeter, Wooclap, ClassroomScreen,Thinglink or Wordwall.

For ideas on how the different tools can support Sentence Builders and the learning experience, click on the following post.  
For How to videos on how to use some of the apps above, click on the following post.

I use, Onenote (Class Notebook) to share the links to these online activities with my students, who need to bring their own device to my lessons. I share my lessons with students weekly. Consequently, students have access, via Onenote, to all worksheets we work with during lessons and to links which will take them to different interactive activities which need to be carried out during lessons or at home, for reinforcement, or as part of homework. 
A normal set of lessons (3 in this case) looks like the example below on Onenote. As you can see there are classic activities such as Battleships (which I could photocopy if I want to) but also links to other interactive activities like Flippity or Wheel of names, to be carried out orally in pairs, or in writing. Reference materials, such as the formation of the past tense in Spanish, are easily shared this way too: 


I teach normally, using my Smartboard, and when prompted by me, students access their Onenote and carry out the online activities with blue links. If using Microsoft apps, such as Word, Forms, Flipgrid, or Genially and Youtube videos, the apps appear automatically embedded on my onenote, which is visually nice! Depending on the activity, students may work on their own, but also in pairs, like in the case below, where Y9 students accessed a Genially interactive game and played in pairs:


Students can also work collaboratively via the Collaboration space on Onenote or a Padlet or Google Document. This is great for brainstorming of ideas on a given topic.

Homework, may include a video, which can be embedded into Onenote, which I have previously recorded with Loom (screencasting) where students need to follow instructions and complete a series of activities directly on Onenote in the box supplied:


Homework can be oral practice, via the Insert Audio function on Onenote, which allows me to carry out a dictation, ask questions which students need to answer, or just repeat after me for pronunciation work. In the example below, students had to click on the Quizizz activity for practice, before listening to my questions which they had to answer using the audio insert on onenote: 


By blending learning and having a platform (Onenote) to share my online activities, as well as worksheets, with my students, I can create Learning Libraries, with resources for specific classes to which students have access at all times, in all spaces.  The resources will also include a wide range of activities using different tools. They are all under Content Library and are classified in different Tabs. See the example below from my Y11 Onenote: 


The way I blend learning is by maximising the use of a wide range of online resources in the classroom, via Onenote.  

Students can access their Onenote, and their interactive personalised activities in lessons but also in any other space (bus, home, library). The online, interactive tasks allow learners to practise key vocabulary and structures (sentence builders) in many different ways and shapes, making the learning experience innovative, catchy, memorable and sticky, just like the different social media platforms, so embedded in our students' lives, do! The difference is, that I use technology not just for entertaining the kids but to enhance their learning experience in all different ways and spaces!


Sunday, 4 October 2020

The Power of Feedback: Spinning the plates!

After four weeks of teaching, today, I would like to reflect on feedback and marking, as both are intrinsically linked, although feedback should be provided by other means rather than marking. 

Feedback is key to teaching, in fact, I believe that Teaching is constant Feedback. Feedback is extremely powerful: Hattie's meta-analysis suggests that good feedback can improve the rate of learning in one year by at least 50%. In fact, the most effective learners always long for feedback on how to get better.

Consequently, feedback should not be a mere marking, ticking box exercise done for SLT or Ofsted! Feedback must take place in the classroom to inform both, our students on how to get better and us, teachers, to check understanding and re-explain, re-model etc.. accordingly. In order words, Feedback should have a double purpose: closing the learning gap for students and inform planning for us, the teachers.

What are the best ways to give feedback to students?

Of course, marking students' work will need to be done at some point, but this should be a meaningful task not a ticking exercise imposed by school without clear follow-up and strategy. There are different ways, we can carry out marking and provide effective feedback while reducing workload, these are the strategies I use to make my marking manageable while providing high impact feedback to my students:

1. Focused editing

I do not mark every single mistake. I believe this is useless. It takes me ages to do so and on most occasions students will take just a minute to go over it with no impact whatsoever. What I do is highlight those mistakes that I know they should not have made, careless mistakes I call them. When work is returned, students always spend good 10 minutes (my starter activity) going through the highlighted bits and trying to spot why they are wrong and correct these errors. Similarly, if I noticed a common pattern in all my students, before they start this process, I point out, to the whole class, some of these mistakes so we reflect on why they are wrong and how to correct them. This is an example of how marking serves to both the student, but also informs me to plan subsequently. As a consequence, after marking a particularly piece of work, I can see that more lessons may be needed to practice different Sentence Builders or a grammatical point. 

2. Mark Live

Although this is not always easy to do, every so often, I see students individually over a key piece of writing. This is mostly the case towards the end of a unit. To do this, I put two lessons aside, when students are working individually over listening practice, so that I can go through a key piece of work, oral or written, with each student at a time. This can be extremely powerful but, I am aware that it may not work with the logistics of some classes, because of large numbers, behaviour management issues etc..  While I speak to each student individually, the rest of the students need also to be 100 % focussed on another activity, which is why individual listening practice with their laptops and headphones is the perfect scenario to do this. 

3. Open Gallery where students mark each other's work

This is another great technique to do every so often, which is powerful and alleviates the marking burden in the teacher. For this purpose I use Padlet for writing and Flipgrid for oral assignments. After a topic has been studied, practised and assimilated well, students will carry out a piece of writing or oral presentation in Padlet or Flipgrid. Armed with a marking scheme, which must be very familiar to students, pupils look at each other's work and mark it accordingly to such marking scheme while spotting errors etc.. This technique is powerful because students become increasingly familiar with a mark scheme, enhancing their exam technique, while they are forced to think about common accuracy errors. Similarly, students can see everyone's work which provides a fantastic model to work from and real peer inspiration!

On the other hand, this technique would only work in a class with a good learning environment where students feel safe with each other and are open to constructive peer criticism. That's why, from day one, the culture I instil in my lessons and students is that failing is the first step to success, in other words, only if you struggle learning does take place.  By creating such culture, students become positive towards potential failure and less anxious to have their work scrutinised by a peer member of the class. 

4. Oral feedback 

Along with highlighting careless mistakes, I always give students feedback on something that went really well and two/three wishes or targets to focus on a second piece of work. This can take a lot of time to write in students' books! We use Onenote in my school, which means, that I can insert an oral audio giving specific feedback to the students much, much quicker!  Oral feedback has reduced my marking time by 50%! Students have headphones with them, and as mentioned above, after work is returned, they are given reflection time to go over my feedback and highlighted bits, individually. In fact, students can respond to my feedback with another audio, where they are asked to model some sentences etc...

If you don't use Onenote, Qwiqr is perfect to do this! Basically, using Qwiqr QR stickers, you can give students fast oral, video or photo feedback. Most importantly, students as in with Onenote, can respond to such feedback with another QR sticker, making it the perfect tool for oral modelling tasks too. 

5. Live feedback in action: Spinning the plates

Use your normal lesson activities for constant live feedback, individually or as a class! Do not wait until you mark their work. Make them think on the spot. Keep moving plates spinning at once in your lessons. This can be done individually or collectively:

  • Move around, as much as we can move around in the current climate, and highlight mistakes you see on the go.
  • Point individual students towards a display or a section in their Onenote or exercise/text book
  • Ask students to review a paragraph or sentence
  • Ask key questions (which ending would you use to talk about what your mum does over the holidays?)
  • Show a model
  • Alert the class of common mistakes that you have spotted, re-explain, re-practice, read aloud or show a good piece.
  • Ask students how they are struggling and ask for solutions. 

If working via Onenote, going through students work, can be done from your desk so that you do not need to come near them!

6. Use self-marking tests

When planning homework tasks for classes, I try to do it so that one piece of homework is writing/reading/oral and another a learning task or listening, which I can quickly mark via a Forms test, Quizizz, LearningApps activity or just Quizlet! Students carry out the test or task in lesson time, without support and will get immediate feedback which, they report to me as a percentage. In a less digital way, I carry out classic tests in a lesson which they mark themselves, reporting their score to me. This is extremely effective as I can easily test how well they have learned vocabulary/ grammar while preventing me from taking a test home to mark!

7.Redrafting

Once feedback has been given, always ask students, in a second homework, maybe a couple of lessons later (interleaving), to carry out the task again, using the comments from their previous draft as a way to improve a subsequent version of their work. 

8. Use of Bitmojis for rewards

During lockdown I started using Bitmojis to reward good work from students. Previously, we used stickers to reward merits/ alphas etc.. according to the school protocol. However, as bitmojis are more personalised, the students preferred them so we have changed the use of old stickers for our bitmojis on Onenote. 

Giving rewards when students excel is another powerful strategy to provide psychological feedback, as students love competitions and are keen to do anything for getting my bitmoji!  This particularly works with disaffected students! By improving in small steps and being rewarded by it, students start believing in themselves and start taking pride in their work, because they feel their efforts are recognised. This culture is intrinsically linked to having high expectations on our students and expect the highest standard of work at all times, regardless of ability!  


Think about the Anchor effect: exposing students to content at a level usually considered above national expectations: at KS3, use of GCSE expressions, at GCSE, use of Alevel work. ANCHOR IN CHALLENGE and REWARD students for it, using your school system when giving FEEDBACK. This will contribute to their Growth Mindset!

By using these 8 techniques, I have witnessed how my students' work, regardless the ability has improved over the years, while my marking load has reduced drastically! FEEDBACK should be the PATH towards INDEPENDENT LEARNING so, it should be MEANINGFUL TO THE STUDENT AND INFORMATIVE TO OUR PLANNING, not a BURDEN imposed by the high spheres! Feedback should not only be present when marking but be embedded in our lessons: spinning the plates!


Monday, 10 August 2020

Blended learning: The use of Onenote and Screen Casting during lockdown and followup

Lock-down was a big shock for all of us, however, amid the chaos, I have found positivism and a great opportunity for the teaching  community to think outside the box and, for the first time, to seriously think about blended learning, that is, how to integrate conventional teaching techniques with IT tools to make the learning experience more memorable, stickier!

When I first found out about lock-down, my first question was whether to teach synchronously or asynchronously. Most teachers in my school chose the first format but I was not sure it would work for MFL, except for small groups such as Alevel students. I made the choice to teach using a mixture of both methods. I was lucky that our school had signed for Office 365 and we had Teams!

My school also chose to respect our normal timetable, so students were expected to join our Teams lessons at the times we would have had our lesson anyway. Students joined via a link sent to them from Firefly, our school intranet and the method we use to set normal homework tasks. Once on Teams, I would have a 5 minute starter synchronously, which I allowed late arrivals to join in.  The starter would normally be a question and answer recap from our previous lesson (retrieval practice).  For this Starter, I would also use Mentimeter , Quizlet, Quizizz or Classroom Screen. I can also recommend using Spiral.ac! This would last 5/10 minutes. The rest of the time, students would work independently, on a well thought out and structured lesson plan using Onenote from Microsoft. Students and I were still on Teams so, if a question rose, they could asked me directly or they could use the chat.  At the same time, Onenote would allow me to check the work students were doing live and give live feedback verbally via Teams or in writing.


So, Onenote was key for my learning distance lessons!  The second element was Youtube and Loom.  What I did, was to screen cast my lessons in 20/30 minute videos, where I would do everything I would normally do in a lesson using the MARS EARS approach explained in previous posts. This means, showing a particularly Sentence Builder sheet and carry out over different Onenote lessons the activities I would normally carry out in face to face lessons: Repetition via TaskMagic/Textivate, Flippity activities, dictation activities, translation activities in writing and orally (Onenote allows you and students to insert audio). After I created my videos, I would upload them onto my Youtube channel ( this step is not necessary, as I can share my videos via a Loom URL, but I like using Youtube as videos get automatically embedded in my Onenote pages/lessons). Below there is an example of a lesson/Onenote page shared with my students using one of my videos:


My third element was the use of Bitmojis!  I used Bitmojis to engage with my students, to give merits to present listening, reading, writing work etc... see example above.

In order to give structure to my students, I created frames in my Onenote pages for them to insert the answers to the interactive videos: translations, dictations, oral input etc..


Onenote allows you to create virtual exercise books for each of your teaching groups. You create a Onenote for each of your sets and add the students to it. Students will then have an individual area in the Onenote only visible by you and them. You also have the Content Library, an area visible for everyone. I create my lessons in the Content Library: I recommend a page per a week’s worth of lessons. In the Content Library I also have different tabs: a grammar section, sentence builder section, mark scheme section etc.. Finally you also get a collaborative section, also visible for everyone, where students  can collaborate and see each other inputs:


I used to distribute my lessons or pages to my students at the beginning of the first lesson of the week, remember that each page has work for the whole week, so every student would have the lesson in their own area, watch my video, do the activities and these could  be corrected by me!

After a few lessons with videos, I would also embed or link other activities in their pages:

Quizizz activites, Quizlet learning courses, Flipgrid assignments, Genially escape rooms, Listening activities via Forms and use of Bitmoji, LearningApps, Deck Toys, Flippity activities, Wheel of Names, Padlet entries or just a writing frame! 


Onenote and Teams have proved invaluable during lockdown and the feedback from my students and parents has been extremely positive!  If a student could not join in a lesson live, they could always complete the work any other time! Synchronous lessons were also very slow with big classes so this approach allowed students to work at their own pace! 

What can be taken forward?

In my MFL department we are definitely planning to continue the use of Onenote as from September. We are not going to get rid of traditional exercise books but this is an excellent way to share IT tools easily with all students with a structure.  Onenote is great for oral practice too, as one of the examples above show, students can repeat after you (using a video), doing reading activities, practise Photocards or recording presentations which you can hear straight away and give instant feedback, orally too!  

We are going to to continue the use of videos (screencasting) for specific listening, oral modelling and homework tasks!  

Finally, if you are absent, your worksheets and any material, such as PPTs etc.. can be shared there for your students. The same works if a pupil is absent and needs to access the missing work.

Feedback is extremely easy to give and much quicker than in conventional exercise books, so when pressed for time, we intend to use Onenote for homework tasks, to which we can respond with specific oral or written (via a digital pen) feedback.

We are planning to work with two exercise books: one digital (a Onenote for each set which will be created in September) and one physical. Students will be required to work with both in lessons, meaning they will need to bring their laptops/ tablets to lessons. We are lucky we have a set of iPads in the department, so students can always access their exercise book even if they forget their own device.

In other words, the lock down has allowed me, and my department, to explore a wide range of IT tools. This skill cannot be wasted but used to enhance the learning experience of our students by making the learning memorable.  Remember the use of IT tools is not the outcome but the means to facilitate our outcome: language proficiency! 

For an insight on how Blended Learning can be incorporated into MFL lessons, listen to the following round table discussion among Joe Dale, Helen Myers, Janet Basnett and myself hosted by Rob Walden from Real World Education for the IFL Festival. 


From 9 to 1: Teaching the mixed ability class at GCSE

After a relaxing summer, away from social media, I am back just for the release of the GCSE exam results. I am generally very pleased with o...